
1. Introduction
This hands-on tutorial explains how to create an IPsec tunnel that uses encryption keys produced using Quantum Key Distribution (QKD).
If you are not yet familiar with QKD, section 3 below describes what QKD is and why you might choose to deploy it.
The following diagram shows the scenario:
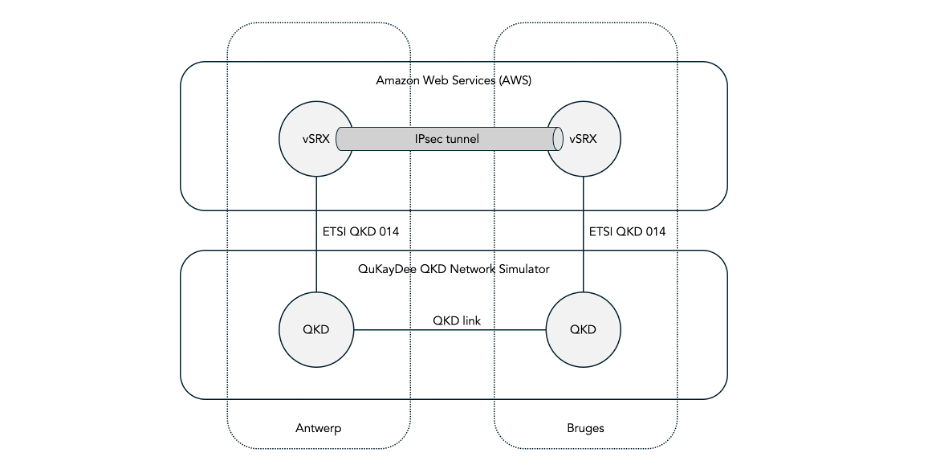
We use Juniper vSRX virtual firewalls hosted in Amazon Web Services (AWS) to create the IPsec tunnel.
The vSRXs are configured to use encryption keys produced by a Quantum Key Distribution (QKD) devices. Since most of you won’t have access to real QKD hardware, we use a cloud-hosted QKD network simulator called QuKayDee to produce the QKD keys.
Some time after posting this blog, we also posted follow-up blog on how to configure IPsec with Post Quantum Cryptography (PQC). Also, in February 2025 we presented a 45-minute free online seminar on deploying quantum-safe IPsec which summarizes the information in both the QKD and the PQC blog.
2. Protocol overview
The following ladder diagram shows the various protocols involved in setting up the IPsec tunnel using QKD keys.

2.1 QKD protocols
The QKD devices in Antwerp and Bruges use some QKD protocol to produce the QKD keys. There are many QKD protocols, including for example BB84 and BBM92. See webinar Protocols for Advanced Secure Protocols for an introduction to the various flavors of QKD protocols.
The details of the QKD protocols have not yet been standardized. As a result, the two QKD devices at either end of a QKD link must be from the same vendor.
As mentioned before, we use QuKayDee (which is a cloud-based QKD network simulator) to simulate the QKD devices and to produce the QKD keys. The main purpose of QuKayDee is to offer QKD-related APIs for interoperability testing and education. It is not a goal of QuKayDee to implement a realistic simulation of the quantum physics or QKD protocols. There are other QKD network simulators that are better for that purpose (see this survey). Under the hood, QuKayDee uses a simple classical pseudo random number generator (PRNG) to generate the keys. These keys are not suitable for use in production networks.
2.2 Key delivery API
The European Telecommunications Standardization Institute (ETSI) has published group specification ETSI GS QKD 014 V1.1.1 (2019-02): Quantum Key Distribution (QKD): Protocol and data format of REST-based key delivery API. We will refer to this as ETSI QKD 014 for short.
ETSI QKD 014 is a standard API that allows encryptors, such as the Juniper vSRX to retrieve encryption keys from a QKD device. This standard is supported by multiple encryptor vendors including Juniper, Fortinet, and others. Note, however, that Cisco uses its own proprietary protocol called the Session Key Import Protocol (SKIP) which QuKayDee plans to support in the future.
ETSI QKD 014 is a REST-based API running over HTTPS. It uses mTLS to allow the encryptor and the QKD device to mutually authenticate each other. Later in the hands-on part of the tutorial we will see that we need to install certificates and keys on the vSRX and on the simulated QKD device in QuKayDee for this mutual authentication.
The two most important API methods in ETSI QKD 014 are Get key and Get key with key IDs.
The initiator (say vSRX Antwerp) invokes the Get key method to request an encryption key from the QKD device. The QKD device responds with a key and a key ID which uniquely identifies the key. Note that the key is secret but they key ID is not secret.
Then, the initiator has to somehow transfer the key ID to the responder (say vSRX Bruges). How this happens is out of scope of ETSI QKD 014. Below, we will see that in the case of IPsec tunnels, this is achieved using the IKEv2 protocol.
The responder invokes the Get key with key IDs method to request the same encryption key from the QKD device. The responder provides the transferred key ID in the request, and the QKD device provides the corresponding key in the response.
It is the job of the QKD protocol running between the QKD devices to synchronize the allocation of key material (key bits) and a key ID to a key between the two QKD devices. As mentioned before, the protocols for this function are not yet standardized and hence QKD vendor proprietary.
2.3 Internet Key Exchange protocol version 2 (IKEv2)
We use the Internet Key Exchange protocol version (IKEv2) defined in RFC 5996 as the control-plane protocol for the IPsec tunnels.
An IPsec tunnel consists of a collection of Security Associations (SAs).
Each SA defines a set of dynamically negotiated security parameters including:
- The encryption algorithm (e.g. AES-256-CBC).
- The authentication method (pre-shared keys or certificates).
- The integrity algorithm, i.e. the hash algorithm for signing (e.g. SHA-256).
- The Diffie-Hellman group for key agreement (e.g. group 14).
There are two types of security associations:
- The IKE SA (also known as the parent SA). This bidirectional SA defines the security parameters for the IKEv2 control-plane traffic itself.
- Zero or more IPsec SAs (also known as child SAs). These unidirectional SAs define the security parameters for specific flows of user traffic.
The IKEv2 protocol runs over UDP and consists of a series of message exchanges, where each exchange consists of a request and a response.
The initial two message exchanged for the setup of an IPsec tunnel are IKE_SA_INIT and IKE_AUTH:
- The IKE_SA_INIT message exchange is used to negotiate the security parameters for the IKE SA and to establish the encryption key for the IKE SA using Diffie-Hellman. There are also some other functions such as NAT detection.
- The IKE_AUTH message exchange is used for the two encryptors to mutually authenticate each other using pre-shared keys or certificates (we use the former) and some other functions.
2.4 Mixing Preshared Keys in IKEv2 for Post-quantum Security
We mentioned earlier that the ETSI QKD 014 key ID is transferred from the initiator encryptor to the responder encryptor using IKEv2.
This is achieved using an extension to IKEv2 defined in RFC 8784: Mixing Preshared Keys in the Internet Key Exchange Protocol Version 2 (IKEv2) for Post-quantum Security.
RFC 8784 makes IPsec post-quantum safe by mixing so-called Post-quantum Pre-shared Keys (PPKs) into the Diffie-Hellman derived keys.
RFC 8784 originally envisioned that the operator would configure the same set of pre-shared keys on both IPsec encryptors (hence the term pre-shared). Each manually configured key was identified by a manually configured key ID.
Later, many (but not all) implementations of RFC 8784 on encryptors also added support for dynamically retrieving the keys using ETSI QKD 014 as an alternative for statically configuring the keys. The encryptor vendor may claim support for PPK (i.e. for RFC 8784) in their documentation, but it is not always clear whether or not this includes integration with ETSI QKD 014. Juniper does support this integration.
The two most important elements of RFC 8784 are:
- A new notification type USE_PPK which is included in the IKE_SA_INIT exchange to negotiate the use or non-use of PPKs.
- A new notification type PPK_IDENTITY which is included in the IKE_AUTH exchange. In the request it contains the key ID provided by the ETSI QKD 014 Get Key method in the PPK_ID field. It the response it is empty to confirm the chosen key ID.
2.5 IPsec Encapsulating Security Payload (ESP)
IPsec supports two methods for encrypting the user data: Encapsulating Security Payload (ESP) or Authentication Header (AH). We use the former.
IKEv2 is used to negotiate whether ESP or AH is used as well as the security parameters (encryption protocol, integrity protocol, encryption key, etc.)
It is possible to setup different IPsec security parameters for different flows of traffic. Each flow is defined by a Traffic Selector (TS) consisting of a source IP address range, a destination IP range, and a port range. And each flow is associated with an IPsec Security Association (SA) also known as a child SA.
3. What is Quantum Key Distribution and why use it?
Before we dive into the hands-on part of the tutorial, we first provide some background information about what QKD is and why we might choose to deploy it.
The impatient amongst you might want to skip this section and jump straight to the hands-on tutorial in section 4 below.
3.1 The quantum threat to IPsec
As discussed above, the IKEv2 protocol uses Diffie-Hellman (DH) to agree on a secret session encryption key for an IPsec Security Association (SA). In this document, whenever we say Diffie-Hellman (DH) we also include Elliptic Curve Diffie-Hellman (ECDH). DH is an algorithm which allow two parties to agree on a secret key over a public channel. Eavesdroppers cannot discover the secret key, even if they are able to observe all of the IKEv2 protocol messages (i.e. even if they can physically tap the wire).
The security of DH relies on a special kind of mathematical function called a trapdoor function. This is a function which is easy to compute in one direction but very difficult to compute in the inverse direction.
In the case of DH, the trapdoor function is called exponentiation in a discrete field modulo a prime. The discrete exponentiation function has the discrete logarithm as its inverse function. It is easy for a computer to compute a discrete exponent ab (mod p), but very difficult to compute a discrete logarithm alog n (mod p).
ECDH uses a slightly different trapdoor function, namely exponentiation in a group defined over an elliptic curve.
You don’t need to understand the details of the math. What is important is that the security relies on the fact that certain mathematical functions are very difficult to compute on a computer. When we say that something is difficult to compute, we mean that it takes millions of years, even on the biggest supercomputer. This makes it impractical for an attacker to perform a brute force search attack.
The problem is that in 1994 it was discovered that these particular trapdoor functions are easy to compute for a new type of computer, called a quantum computer.
Quantum computers are currently being developed by a large number of companies including IBM, Rigetti, IONQ, Quantinuum, Atom Computing, Alice & Bob, Xanadu, Alpine Quantum Technologies, Diraq, Infleqtion, IQM, Orca Computing, Oxford Ionics, Oxford Quantum Circuits, Pasqal, Planqc, PsiQuantum, Quantum Computing Inc., QuEra, Quandella, QuantWare, Quantum Brilliance, and others.
These quantum computers work in a fundamentally different way than all of the computers that we use today (desktops, laptops, mobile phones, mainframes, super computers, etc.), which we refer to as classical computers in this context.
Existing classical computers rely on bits, which are either zero or one. Quantum computers, on the other hand, use quantum bits (qubits) which can be in a superposition state, which -in a certain sense- is both zero and one at the same time. Quantum computers use certain special properties of quantum physics including superposition, interference and entanglement to perform calculations in a way that is fundamentally different from existing classical computers.
For the vast majority of applications, these quantum computers are much less powerful and much more expensive than existing classical computers. However, there is a handful of very specific algorithms for which quantum computers are vastly more powerful than classical computers.
One of those algorithms is called Shor’s algorithm which was discovered by mathematician Peter Shor in 1994.
Shor’s algorithm enables a sufficiently reliable and large quantum computer to factor numbers and compute discrete logs in polynomial time instead of the exponential time that it takes classical computers. This means that such a sufficiently reliable and large quantum computer would be able to perform the calculation in seconds or minutes instead of millions of years.
This new development will make certain existing security protocols unsafe. Specifically, a sufficiently reliable and large quantum computer will be able to break Diffie-Hellman (DH), Elliptic Curve Diffie-Hellman (ECDH), and Rivest Shamir Adleman (RSA) asymmetric encryption. Since IKEv2 relies on these protocols, IKEv2 will be broken.
Luckily, despite the very large number of companies working on quantum computers, none of the publicly known quantum computers are sufficiently reliable and large to run Shor’s algorithm at this point in time. More research and development is needed to make quantum computers more resistant against noise and to increase the number of qubits. Opinions vary on how long this will take or whether it will ever happen, but it could be as soon as 5 to 10 years from now.
We also need to consider so-called Harvest Now Decrypt Later (HNDL) attacks, where an attack makes a copy of encrypted traffic today with the intent of decrypting it later, say 5 to 10 years from now, when a sufficiently reliable and large quantum computer exists. Even if the traffic was encrypted with a Diffie-Hellman generated ephemeral key, which is supposed to provide forward secrecy, such a quantum computer will be able to go back and decrypt that traffic.
3.2 Approaches for remediating the quantum threat
Given the fact that certain existing types of classical encryption algorithms which are widely used today (specifically RSA, DH, and ECDH) will likely be broken by the advent of quantum computers, what can we do about it?
There are two main approaches to remediating the risk: Post Quantum Cryptography (PQC) and Quantum Key Distribution (QKD).
Post-Quantum Cryptography (PQC) replaces the mathematical problem that are vulnerable to attack by quantum computers (factorization, discrete logarithms) with different mathematical problems that are believed to be secure against an attack by any computer, including a quantum computer.
The National Institute of Standards and Technology (NIST) is very close to finalizing three Federal Information Processing Standards (FIPS) to standardize these new algorithms.
Quantum Key Distribution (QKD) uses the quantum physical properties of individual photons (very weak pulses of light) to securely distribute keys in such a manner that any attempt to steal the key will be detected. It is sometimes referred to as a physics-based approach (as opposed to a computational-complexity-based approach).
QKD is a relatively mature technology. For several years already, there have been multiple vendors that offer commercial QKD products, including: Toshiba, ID Quantique, Q*Bird, KEEQUANT, Quintessence Labs, QNu Labs, LuxQuanta, and Quantum Optics Jena.
For more details on QKD algorithms see webinar Protocols for Advanced Secure Protocols.
4. Step-by-step instructions for configuring an IPsec tunnel using QKD keys
The step-by-step instructions in this section describe how to:
- Deploy the vSRXs in AWS.
- Configure an IPsec tunnel between the vSRXs using Diffie-Hellman keys.
- Configure the vSRXs and QuKayDee to use QKD keys for the IPsec tunnel instead of Diffie-Hellman keys.
- Verify that everything works.
Let’s get started.
4.1 Conventions
We use the following conventions in the configuration instructions.
A yellow box indicates a command to enter in your computer’s shell. We are using zsh on macOS, but any Linux-like shell should do:
$ date
Sun Jul 14 08:34:52 CST 2024
We assume that the following environment variables are set in the shell. In the instructions below, we will indicate where to get the values for these environment variables.
| Environment variable | Value |
| VSRX_ANTWERP_IP | The AWS elastic IP address associated with the AWS instance running vSRX Antwerp. |
| VSRX_BRUGES_IP | The AWS elastic IP address associated with the AWS instance running vSRX Bruges. |
| VSRX_SSH_KEY | The full path of the file which contains the private key to SSH the vSRX instances. |
A blue box indicates a command to enter in the Junos Command Line Interface (CLI) of vSRX Antwerp:
ec2-user@vsrx-antwerp> show version
Hostname: vsrx-antwerp
Model: vSRX
Junos: 22.4R3.25
JUNOS OS Kernel 64-bit XEN [20231013.108e0b3_builder_stable_12_224]
JUNOS OS libs [20231013.108e0b3_builder_stable_12_224]
JUNOS OS runtime [20231013.108e0b3_builder_stable_12_224]
...
A green box indicates a command to enter in the CLI of vSRX Bruges:
ec2-user@vsrx-bruges> show system uptime
Current time: 2024-07-14 14:46:49 UTC
Time Source:  LOCAL CLOCK
System booted: 2024-07-14 14:42:01 UTC (00:04:48 ago)
Protocols started: 2024-07-14 14:43:58 UTC (00:02:51 ago)
Last configured: 2024-07-12 15:29:40 UTC (1d 23:17 ago) by ec2-user
 2:46PM  up 5 mins, 1 users, load averages: 1.48, 1.14, 0.53
We will often ask to add a given configuration to a vSRX. For example, we might ask “add the following configuration to vSRX Antwerp”:
system {
    host-name vsrx-antwerp;
    location {
        latitude 20.522710;
        longitude -99.891585;
    }
}
The way to do this is to select and copy the configuration snippet into the clipboard of your computer. Then enter the following commands in the CLI of the vSRX and paste the copied configuration snippet at the appropriate place.
ec2-user@vsrx-antwerp> configure
Entering configuration mode

[edit]
ec2-user@vsrx-antwerp# load merge terminal
[Type ^D at a new line to end input]
Paste the configuration snippet that was copied onto the clipboard here
Type Control-D (^D)
load complete

[edit]
ec2-user@vsrx-antwerp# commit and-quit
commit complete
Exiting configuration mode

ec2-user@vsrx-antwerp>
Most other Juniper related tutorials will provide the configuration in the form of a series of set commands as shown below. I am not a fan of providing Junos configurations in this manner; it obscures the beautiful hierarchical structure of Junos configurations and makes large configurations difficult to read.
set system host-name vsrx-antwerp
set system location latitude 20.522710
set system location longitude -99.891585
4.2 Deploy the vSRXs in AWS
The first step is to create the various resources in AWS for the scenario as shown in the figure below:
- A Virtual Private Cloud (VPC) named vsrx-vpc.
- An EC2 instance for each of the two vSRXs: vsrx-antwerp, and vsrx-bruges.
- Subnet vsrx-mgmt for the management network.
- Subnet vsrx-untrust for the untrusted network between the two vSRXs.
- An elastic IP address for the management interface on each of the vSRX instances.
- An Internet Gateway to connect the management interface to the public Internet.

The management subnet and the Internet gateway are used for two different purposes:
- For network management. It allows us to use SSH to login to the command line interface (CLI) of the vSRXs. And it allows us to use HTTPS to connect to the graphical user interface (GUI) of the vSRXs.
- For key delivery. It allows the vSRXs running in AWS to connect to simulated QKD devices running in QuKayDee and retrieve keys using the ETSI QKD 014 API.
In a real-life deployment we would want to keep management and key delivery separated for security reasons and use two separate subnets. To keep things as simple as possible, we use one common subnet here.
In appendix A we describe how to manually configure these resources using the AWS console. This is a good learning experience but tedious and error-prone. In production deployments one would use something like AWS CloudFormation or TerraForm to automate the deployment.
4.3 Configure the IPsec tunnel on the vSRXs (using Diffie-Hellman keys)
First, we configure an IPsec tunnel between the two vSRX using Diffie-Hellman generated keys, i.e. not yet using key delivery by QKD devices. This allows us to verify that the vSRXs are up and running, properly configured, and that traffic can flow through the IPsec tunnel before we bring QKD into the picture.
Add the following configuration to vSRX Antwerp. This configuration is quite long; we will explain the various parts below.
system {
    host-name vsrx-antwerp;
}
security {
    ike {
        proposal IKE-PROPOSAL {
            authentication-method pre-shared-keys;
            dh-group group14;
            authentication-algorithm sha-256;
            encryption-algorithm aes-256-cbc;
        }
        policy IKE-POLICY {
            mode main;
            proposals IKE-PROPOSAL;
            pre-shared-key ascii-text "$9$USDik.m5zF6ApM8x7Vbmf5";
        }
        gateway IKE-GATEWAY {
            ike-policy IKE-POLICY;
            local-address 10.0.2.11;
            address 10.0.2.22;
            external-interface ge-0/0/0;
            version v2-only;
        }
    }
    ipsec {
        proposal IPSEC-PROPOSAL {
            protocol esp;
            authentication-algorithm hmac-sha-512;
            encryption-algorithm aes-256-cbc;
        };
        policy IPSEC-POLICY {
            proposals IPSEC-PROPOSAL;
        }
        vpn IPSEC-VPN {
            bind-interface st0.0;
            ike {
                gateway IKE-GATEWAY;
                ipsec-policy IPSEC-POLICY;
            }
            establish-tunnels immediately;
        }
    }
    zones {
        security-zone ZONE-UNTRUST {
            interfaces {
                ge-0/0/0.0 {
                    host-inbound-traffic {
                        system-services {
                            ping;
                            ike;
                        }
                    }
                }
            }
        }
        security-zone ZONE-TRUST {
            interfaces {
                lo0.0 {
                    host-inbound-traffic {
                        system-services {
                            all;
                        }
                    }
                }
            }
        }
        security-zone ZONE-VPN {
            interfaces {
                st0.0 {
                    host-inbound-traffic {
                        system-services {
                            ping;
                        }
                    }
                }
            }
        }
    }
    address-book {
        ANTWERP {
            address ANTWERP-NET 11.11.11.11/32;
            attach {
                zone ZONE-TRUST;
            }
        }
        BRUGES {
            address BRUGES-NET 22.22.22.22/32;
            attach {
                zone ZONE-VPN;
            }
        }
    }
    policies {
        from-zone ZONE-TRUST to-zone ZONE-UNTRUST {
            policy TRUST-TO-UNTRUST-POLICY {
                match {
                    source-address any;
                    destination-address any;
                    application any;
                }
                then {
                    permit;
                }
            }
        }
        from-zone ZONE-TRUST to-zone ZONE-VPN {
            policy TRUST-TO-VPN-POLICY {
                match {
                    source-address ANTWERP-NET;
                    destination-address BRUGES-NET;
                    application any;
                }
                then {
                    permit;
                }
            }
        }
        from-zone ZONE-VPN to-zone ZONE-TRUST {
            policy VPN-TO-TRUST-POLICY {
                match {
                    source-address BRUGES-NET;
                    destination-address ANTWERP-NET;
                    application any;
                }
                then {
                    permit;
                }
            }
        }
    }
}
interfaces {
    ge-0/0/0 {
        unit 0 {
            family inet {
                address 10.0.2.11/24;
            }
        }
    }
    lo0 {
        unit 0 {
            family inet {
                address 11.11.11.11/32;
            }
        }
    }
    st0 {
        unit 0 {
            family inet {
                address 10.0.3.11/24;
            }
        }
    }
}
routing-options {
    static {
        route 22.22.22.22/32 next-hop st0.0;
    }
}
Add the following configuration to vSRX Bruges.
system {
    host-name vsrx-bruges;
}
security {
    ike {
        proposal IKE-PROPOSAL {
            authentication-method pre-shared-keys;
            dh-group group14;
            authentication-algorithm sha-256;
            encryption-algorithm aes-256-cbc;
        }
        policy IKE-POLICY {
            mode main;
            proposals IKE-PROPOSAL;
            pre-shared-key ascii-text "$9$USDik.m5zF6ApM8x7Vbmf5";
        }
        gateway IKE-GATEWAY {
            ike-policy IKE-POLICY;
            local-address 10.0.2.22;
            address 10.0.2.11;
            external-interface ge-0/0/0;
            version v2-only;
        }
    }
    ipsec {
        proposal IPSEC-PROPOSAL {
            protocol esp;
            authentication-algorithm hmac-sha-512;
            encryption-algorithm aes-256-cbc;
        };
        policy IPSEC-POLICY {
            proposals IPSEC-PROPOSAL;
        }
        vpn IPSEC-VPN {
            bind-interface st0.0;
            ike {
                gateway IKE-GATEWAY;
                ipsec-policy IPSEC-POLICY;
            }
            establish-tunnels immediately;
        }
    }
    zones {
        security-zone ZONE-UNTRUST {
            interfaces {
                ge-0/0/0.0 {
                    host-inbound-traffic {
                        system-services {
                            ping;
                            ike;
                        }
                    }
                }
            }
        }
        security-zone ZONE-TRUST {
            interfaces {
                lo0.0 {
                    host-inbound-traffic {
                        system-services {
                            all;
                        }
                    }
                }
            }
        }
        security-zone ZONE-VPN {
            interfaces {
                st0.0 {
                    host-inbound-traffic {
                        system-services {
                            ping;
                        }
                    }
                }
            }
        }
    }
    address-book {
        ANTWERP {
            address ANTWERP-NET 11.11.11.11/32;
            attach {
                zone ZONE-VPN;
            }
        }
        BRUGES {
            address BRUGES-NET 22.22.22.22/32;
            attach {
                zone ZONE-TRUST;
            }
        }
    }
    policies {
        from-zone ZONE-TRUST to-zone ZONE-UNTRUST {
            policy TRUST-TO-UNTRUST-POLICY {
                match {
                    source-address any;
                    destination-address any;
                    application any;
                }
                then {
                    permit;
                }
            }
        }
        from-zone ZONE-TRUST to-zone ZONE-VPN {
            policy TRUST-TO-VPN-POLICY {
                match {
                    source-address BRUGES-NET;
                    destination-address ANTWERP-NET;
                    application any;
                }
                then {
                    permit;
                }
            }
        }
        from-zone ZONE-VPN to-zone ZONE-TRUST {
            policy VPN-TO-TRUST-POLICY {
                match {
                    source-address ANTWERP-NET;
                    destination-address BRUGES-NET;
                    application any;
                }
                then {
                    permit;
                }
            }
        }
    }
}
interfaces {
    ge-0/0/0 {
        unit 0 {
            family inet {
                address 10.0.2.22/24;
            }
        }
    }
    lo0 {
        unit 0 {
            family inet {
                address 22.22.22.22/32;
            }
        }
    }
    st0 {
        unit 0 {
            family inet {
                address 10.0.3.22/24;
            }
        }
    }
}
routing-options {
    static {
        route 11.11.11.11/32 next-hop st0.0;
    }
}
We now explain the various parts of the configuration on vSRX Antwerp. We don’t explain every little part of the configuration, only the non-obvious parts. Also, we don’t explain the configuration on vSRX Bruges, since it has the same structure and meaning. You don’t need to copy and paste the configuration snippets in the remainder of this section onto the vSRX; you have already done that above.
The following section configures the interfaces:
- Interface ge-0/0/0 has IP address 10.0.2.11/24 on the AWS vsrx-untrust subnet.
- Interface lo0 is the loopback interface and has IP address 11.11.11.11/32.
- Interface st0 is the secure tunnel interface that represents the IPsec tunnel and has IP address 10.0.3.11/24.
interfaces {
    ge-0/0/0 {
        unit 0 {
            family inet {
                address 10.0.2.11/24;
            }
        }
    }
    lo0 {
        unit 0 {
            family inet {
                address 11.11.11.11/32;
            }
        }
    }
    st0 {
        unit 0 {
            family inet {
                address 10.0.3.11/24;
            }
        }
    }
}
You may notice that the configuration for the management interface fxp0 is missing. This interface is configured in the default configuration that was generated when the vSRX instance was created and rebooted. The management interface uses DHCP to get a private IP address which is mapped to a public IP address using an AWS Elastic IP.
groups {
    aws-default {
        interfaces {
            fxp0 {
                unit 0 {
                    family inet {
                        dhcp;
                    }
                }
            }
        }
    }
}
apply-groups aws-default;
The following section defines the security zones:
| Zone name | Interface | Host inbound traffic |
| ZONE-UNTRUST | ge-0/0/0.0 | ping, IKE |
| ZONE-TRUST | lo0.0 | all |
| ZONE-VPN | st0.0 | ping |
security {
    zones {
        security-zone ZONE-UNTRUST {
            interfaces {
                ge-0/0/0.0 {
                    host-inbound-traffic {
                        system-services {
                            ping;
                            ike;
                        }
                    }
                }
            }
        }
        security-zone ZONE-TRUST {
            interfaces {
                lo0.0 {
                    host-inbound-traffic {
                        system-services {
                            all;
                        }
                    }
                }
            }
        }
        security-zone ZONE-VPN {
            interfaces {
                st0.0 {
                    host-inbound-traffic {
                        system-services {
                            ping;
                        }
                    }
                }
            }
        }
    }
}
The following section creates an address book to assign names to addresses:
security {
    address-book {
        ANTWERP {
            address ANTWERP-NET 11.11.11.11/32;
            attach {
                zone ZONE-TRUST;
            }
        }
        BRUGES {
            address BRUGES-NET 22.22.22.22/32;
            attach {
                zone ZONE-VPN;
            }
        }
    }
}
The following section creates the security zone policies. This describes which traffic is allowed to flow from which zone to which zone:
- ZONE-TRUST → ZONE-UNTRUST: Allow all traffic
- ZONE-TRUST → ZONE-VPN: Allow only vSRX Antwerp to vSRX Bruges loopback
- ZONE-VPN → ZONE-TRUST: Allow only vSRX Bruges to vSRX Antwerp loopback
security {
    policies {
        from-zone ZONE-TRUST to-zone ZONE-UNTRUST {
            policy TRUST-TO-UNTRUST-POLICY {
                match {
                    source-address any;
                    destination-address any;
                    application any;
                }
                then {
                    permit;
                }
            }
        }
        from-zone ZONE-TRUST to-zone ZONE-VPN {
            policy TRUST-TO-VPN-POLICY {
                match {
                    source-address ANTWERP-NET;
                    destination-address BRUGES-NET;
                    application any;
                }
                then {
                    permit;
                }
            }
        }
        from-zone ZONE-VPN to-zone ZONE-TRUST {
            policy VPN-TO-TRUST-POLICY {
                match {
                    source-address BRUGES-NET;
                    destination-address ANTWERP-NET;
                    application any;
                }
                then {
                    permit;
                }
            }
        }
    }
}
The following section configures a static route for loopback of vSRX Bruges, pointing into the IPsec tunnel. This will allow us to ping from the vSRX Antwerp loopback to the vSRX Bruges loopback, going through the IPsec tunnel once it is up.
routing-options {
    static {
        route 22.22.22.22/32 next-hop st0.0;
    }
}
The following session defines the security parameters proposal for the IKE security association: pre-shared keys for authentication, 2048 bit Diffie-Hellman (group 14) for encryption key generation, SHA-256 for signing hashes, and AES-256-CBC for encryption.
security {
    ike {
        proposal IKE-PROPOSAL {
            authentication-method pre-shared-keys;
            dh-group group14;
            authentication-algorithm sha-256;
            encryption-algorithm aes-256-cbc;
        }
    }
}
The following section defines the policy for the IKE security association. It uses the main mode of the IKEv2 protocol (as opposed to the aggressive mode which is faster but less secure). It refers to the IKE proposal that we just defined for the security parameters. And it provides the value for the pre-shared key which is used for authentication (not for encryption, Diffie-Hellman is used to generate the encryption key).
security {
    ike {
        policy IKE-POLICY {
            mode main;
            proposals IKE-PROPOSAL;
            pre-shared-key ascii-text "$9$USDik.m5zF6ApM8x7Vbmf5";
        }
    }
}
The following sections defines the gateway for the IKE security association. It refers to the IKE policy that we just defined. It provides the local IP address 10.0.2.11 and local interface ge-0/0/0 on vSRX Antwerp and the remote IP address on vSRX Bruges to use for the IKEv2 control-plan protocol. We force the use of IKEv2 (we don’t allow IKEv1).
security {
    ike {
        gateway IKE-GATEWAY {
            ike-policy IKE-POLICY;
            local-address 10.0.2.11;
            address 10.0.2.22;
            external-interface ge-0/0/0;
            version v2-only;
        }
}
4.4 Verify that the IPsec tunnel (using Diffie-Hellman keys) comes up
Perform the following show commands on vSRX Antwerp to verify that everything is working as expected, in particular that the IPsec tunnel comes up and forwards traffic.
On vSRX Antwerp, verify that interface ge-0/0/0 is up:
ec2-user@vsrx-antwerp> show interfaces ge-0/0/0 terse
Interface               Admin Link Proto    Local                 Remote
ge-0/0/0                up    up
ge-0/0/0.0              up    up   inet     10.0.2.11/24
The vSRX may report that the interface does not exist:
ec2-user@vsrx-antwerp> show interfaces ge-0/0/0 terse
error: device ge-0/0/0 not found
In that case, reboot the vSRX:
- Go to Services > Compute > EC2 > Instances
- Select vsrx-antwerp in the list of instances
- Select Instance State > Reboot instance
- Select Actions > Monitor and troubleshoot > EC2 serial console
- Click Connect
- Monitor the progress of the boot process
- Verify that eventually the login prompt appears
- Do not attempt to login on the serial console
- SSH into vSRX Antwerp:
$ ssh -i $VSRX_SSH_KEY ec2-user@$VSRX_ANTWERP_IP
Last login: Mon Jul 15 16:16:04 2024 from 189.180.192.146
--- JUNOS 22.4R3.25 Kernel 64-bit XEN JNPR-12.1-20231013.108e0b3_buil
ec2-user@vsrx-antwerp>- Wait at least 15 seconds
- At this point the interface should exist:
ec2-user@vsrx-antwerp> show interfaces ge-0/0/0 terse
Interface               Admin Link Proto    Local                 Remote
ge-0/0/0                up    up
ge-0/0/0.0              up    up   inet     10.0.2.11/24
Do the same on vSRX Bruges: verify that interface ge-0/0/0 exists is up:
ec2-user@vsrx-bruges> show interfaces ge-0/0/0 terse
Interface               Admin Link Proto    Local                 Remote
ge-0/0/0                up    up
ge-0/0/0.0              up    up   inet     10.0.2.22/24
If not, reboot vSRX Bruges as described above.
On vSRX Antwerp, verify that the IKE security association to vSRX Bruges is up:
ec2-user@vsrx-antwerp> show security ike security-associations
Index   State  Initiator cookie  Responder cookie  Mode       Remote Address
110     UP     c4709d9b2ec394e7  c05507bc2f697282  IKEv2      10.0.2.22
Look at the details for the IKE security association:
ec2-user@vsrx-antwerp> show security ike security-associations detail
IKE peer 10.0.2.22, Index 110, Gateway Name: IKE-GATEWAY
  Role: Responder, State: UP
  Initiator cookie: c4709d9b2ec394e7, Responder cookie: c05507bc2f697282
  Exchange type: IKEv2, Authentication method: Pre-shared-keys
  Local gateway interface: ge-0/0/0.0
  Routing instance: default
  Local: 10.0.2.11:500, Remote: 10.0.2.22:500
  Lifetime: Expires in 28767 seconds
  Reauth Lifetime: Disabled
  IKE Fragmentation: Enabled, Size: 576
  Remote Access Client Info: Unknown Client
  Peer ike-id: 10.0.2.22
  AAA assigned IP: 0.0.0.0
  PPK-profile: None
  Algorithms:
   Authentication        : hmac-sha256-128
   Encryption            : aes256-cbc
   Pseudo random function: hmac-sha256
   Diffie-Hellman group  : DH-group-14
  Traffic statistics:
   Input  bytes  :                  778
   Output bytes  :                  778
   Input  packets:                    2
   Output packets:                    2
   Input  fragmented packets:       0
   Output fragmented packets:       0
  IPSec security associations: 2 created, 0 deleted
  Phase 2 negotiations in progress: 1
  IPSec Tunnel IDs: 500005

    Negotiation type: Quick mode, Role: Responder, Message ID: 0
    Local: 10.0.2.11:500, Remote: 10.0.2.22:500
    Local identity: 10.0.2.11
    Remote identity: 10.0.2.22
    Flags: IKE SA is created

  IPsec SA Rekey CREATE_CHILD_SA exchange stats:
   Initiator stats:                                  Responder stats:
    Request Out             : 0                       Request In             : 0
    Response In             : 0                       Response Out           : 0
    No Proposal Chosen In   : 0                       No Proposal Chosen Out : 0
    Invalid KE In           : 0                       Invalid KE Out         : 0
    TS Unacceptable In      : 0                       TS Unacceptable Out    : 0
    Res DH Compute Key Fail : 0                       Res DH Compute Key Fail: 0
    Res Verify SA Fail      : 0
    Res Verify DH Group Fail: 0
    Res Verify TS Fail      : 0
Verify that the IPsec security association to vSRX Bruges is up:
ec2-user@vsrx-antwerp> show security ipsec security-associations
  Total active tunnels: 1     Total IPsec sas: 1
  ID      Algorithm       SPI      Life:sec/kb  Mon lsys Port  Gateway
  <500005 ESP:aes-cbc-256/sha512 0x52169194 3541/ unlim - root 500 10.0.2.22
  >500005 ESP:aes-cbc-256/sha512 0xb0593b65 3541/ unlim - root 500 10.0.2.22
Look at the details for the IPsec security association:
ec2-user@vsrx-antwerp> show security ipsec security-associations detail

ID: 500005 Virtual-system: root, VPN Name: IPSEC-VPN
  Local Gateway: 10.0.2.11, Remote Gateway: 10.0.2.22
  Local Identity: ipv4(0.0.0.0-255.255.255.255)
  Remote Identity: ipv4(0.0.0.0-255.255.255.255)
  TS Type: proxy-id
  Version: IKEv2
  Quantum Secured: No
  PFS group: N/A
  DF-bit: clear, Copy-Outer-DSCP: Disabled, Bind-interface: st0.0, Policy-name: IPSEC-POLICY
  Port: 500, Nego#: 0, Fail#: 0, Def-Del#: 0 Flag: 0
  Multi-sa, Configured SAs# 0, Negotiated SAs#: 0
  Tunnel events:
    Mon Jul 15 2024 19:31:59: IPsec SA negotiation succeeds (1 times)
  Location: FPC 0, PIC 0, KMD-Instance 0
  Anchorship: Thread 1
  Distribution-Profile: default-profile
  Direction: inbound, SPI: 0x52169194, AUX-SPI: 0
                              , VPN Monitoring: -
    Hard lifetime: Expires in 3524 seconds
    Lifesize Remaining:  Unlimited
    Soft lifetime: Expires in 2899 seconds
    Mode: Tunnel(0 0), Type: dynamic, State: installed
    Protocol: ESP, Authentication: hmac-sha512, Encryption: aes-cbc (256 bits)
    Anti-replay service: counter-based enabled, Replay window size: 64
    Extended-Sequence-Number: Disabled
    tunnel-establishment: establish-tunnels-immediately
    IKE SA Index: 110
  Direction: outbound, SPI: 0xb0593b65, AUX-SPI: 0
                              , VPN Monitoring: -
    Hard lifetime: Expires in 3524 seconds
    Lifesize Remaining:  Unlimited
    Soft lifetime: Expires in 2899 seconds
    Mode: Tunnel(0 0), Type: dynamic, State: installed
    Protocol: ESP, Authentication: hmac-sha512, Encryption: aes-cbc (256 bits)
    Anti-replay service: counter-based enabled, Replay window size: 64
    Extended-Sequence-Number: Disabled
    tunnel-establishment: establish-tunnels-immediately
    IKE SA Index: 110
Verify that we can ping from the loopback of vSRX Antwerp to the loopback of vSRX Bruges:
ec2-user@vsrx-antwerp> ping count 5 source 11.11.11.11 22.22.22.22
PING 22.22.22.22 (22.22.22.22): 56 data bytes
64 bytes from 22.22.22.22: icmp_seq=0 ttl=64 time=0.719 ms
64 bytes from 22.22.22.22: icmp_seq=1 ttl=64 time=0.777 ms
64 bytes from 22.22.22.22: icmp_seq=2 ttl=64 time=0.765 ms
64 bytes from 22.22.22.22: icmp_seq=3 ttl=64 time=0.697 ms
64 bytes from 22.22.22.22: icmp_seq=4 ttl=64 time=0.725 ms

--- 22.22.22.22 ping statistics ---
5 packets transmitted, 5 packets received, 0% packet loss
round-trip min/avg/max/stddev = 0.697/0.737/0.777/0.030 ms
We will now verify that this ping traffic actually flows through the IPsec tunnel. For this, we first open an extra SSH session to vSRX Antwerp and monitor the traffic on the IPsec tunnel interface st0.0:
ec2-user@vsrx-antwerp> monitor interface st0.0
vsrx-antwerp                      Seconds: 20                  Time: 16:32:12
                                                           Delay: 0/0/1
Interface: st0.0, Enabled, Link is Up
Flags: Point-To-Point SNMP-Traps
Encapsulation: Secure-Tunnel
Local statistics:                                                Current delta
  Input bytes:                      1344                                   [0]
  Output bytes:                     1344                                   [0]
  Input packets:                      16                                   [0]
  Output packets:                     16                                   [0]
Remote statistics:
  Input bytes:                         0 (0 bps)                           [0]
  Output bytes:                        0 (0 bps)                           [0]
  Input packets:                       0 (0 pps)                           [0]
  Output packets:                      0 (0 pps)                           [0]
Traffic statistics:
  Input bytes:                      1344                                   [0]
  Output bytes:                     1344                                   [0]
  Input packets:                      16                                   [0]
  Output packets:                     16                                   [0]
Protocol: inet, MTU: 9192, Flags: None
While we are monitoring the interface in the new SSH session, we start a rapid ping in the original SSH session:
ec2-user@vsrx-antwerp> ping rapid count 1000000 source 11.11.11.11 22.22.22.22
PING 22.22.22.22 (22.22.22.22): 56 data bytes
!!!!!!!!!!!!!!!!!!!!!!!!!!!!!!!!!!!!!!!!!!!!!!!!!!!!!!!!!!!!!!!!!!!!!!!!!!!!!!!!!!!!!!!!!!!!!!!!!!!!!!!!!!!!!!!!!!!!!!!!!!!!!!!!!!!!!!!!!!!!!!!!!!!!!!!!!!!!!!!!!!!!!!!!!!!!!!!!!!!!!!!!!!!!!!!!!!!!!!!!!!!!!!!!!!!!!!!!!!!!!!!!!!
In the monitor window, we should see the counters for interface st0.0 go up:
vsrx-antwerp                      Seconds: 191                 Time: 16:35:03
                                                           Delay: 0/0/1
Interface: st0.0, Enabled, Link is Up
Flags: Point-To-Point SNMP-Traps
Encapsulation: Secure-Tunnel
Local statistics:                                                Current delta
  Input bytes:                   8490888                             [8489544]
  Output bytes:                  8490972                             [8489628]
  Input packets:                  101082                              [101066]
  Output packets:                 101083                              [101067]
Remote statistics:
  Input bytes:                         0 (0 bps)                           [0]
  Output bytes:                        0 (0 bps)                           [0]
  Input packets:                       0 (0 pps)                           [0]
  Output packets:                      0 (0 pps)                           [0]
Traffic statistics:
  Input bytes:                   8490888                             [8489544]
  Output bytes:                  8490972                             [8489628]
  Input packets:                  101082                              [101066]
  Output packets:                 101083                              [101067]
Protocol: inet, MTU: 9192, Flags: None
Stop the ping by typing Control-C. Stop the monitor by typing q.
4.5 Configure QuKayDee to deliver QKD keys to the vSRXs
At this point we have created an IPsec tunnel between the two vSRXs, we have verified that the IPsec tunnel is up, and that traffic flows through it. However, the IPsec tunnel still uses Diffie-Hellman generated keys, it does not yet use QKD-generated keys. We will now explain how to modify the vSRX configuration to start consuming QKD-generated keys generated by the could-based simulated QKD network QuKayDee using the ETSI QKD 014 interface.
Go to the QuKayDee website https://qukaydee.com/:
Click Create Free Account.
Choose a username and password, enter your email address, and click Create Account.
Wait for the account activation email to arrive (also check your junk folder) and click on the link in that email.
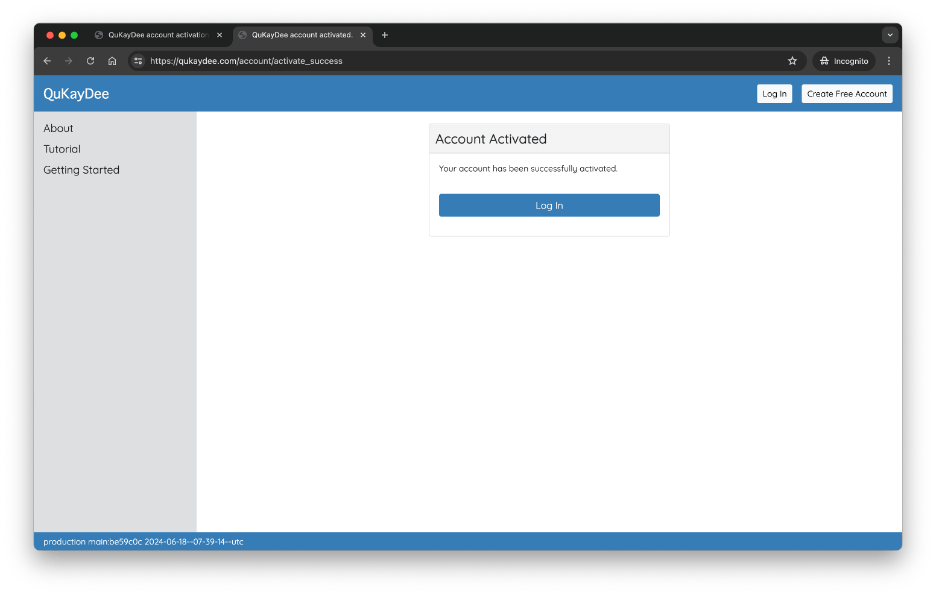
Click Log In:

Enter your username and password and click Log In.

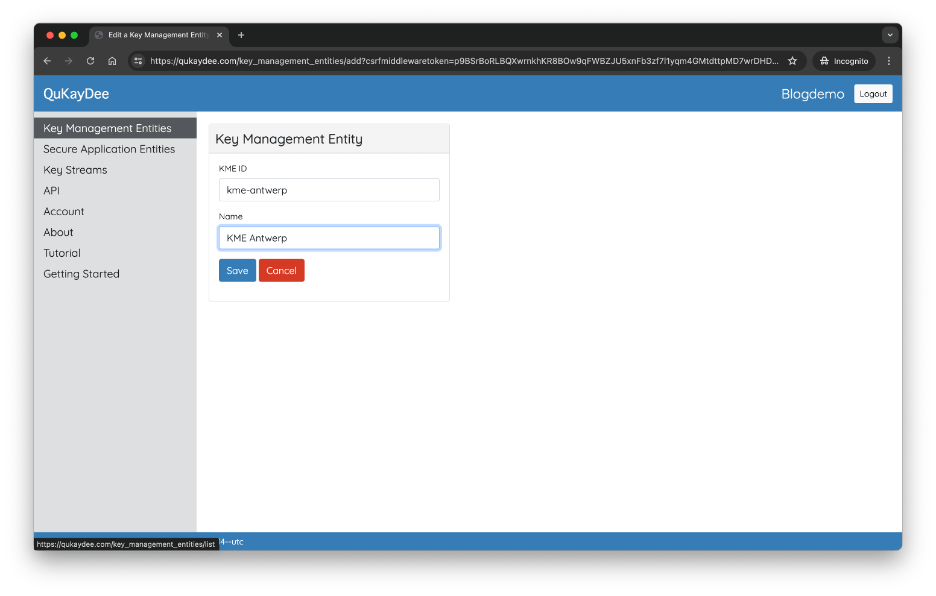
Create the Key Management Entity (KME) in Antwerp:
- Select Key Management Entities in menu
- Click Add
- KME ID = kme-antwerp
- Name = KME Antwerp
- Click Save

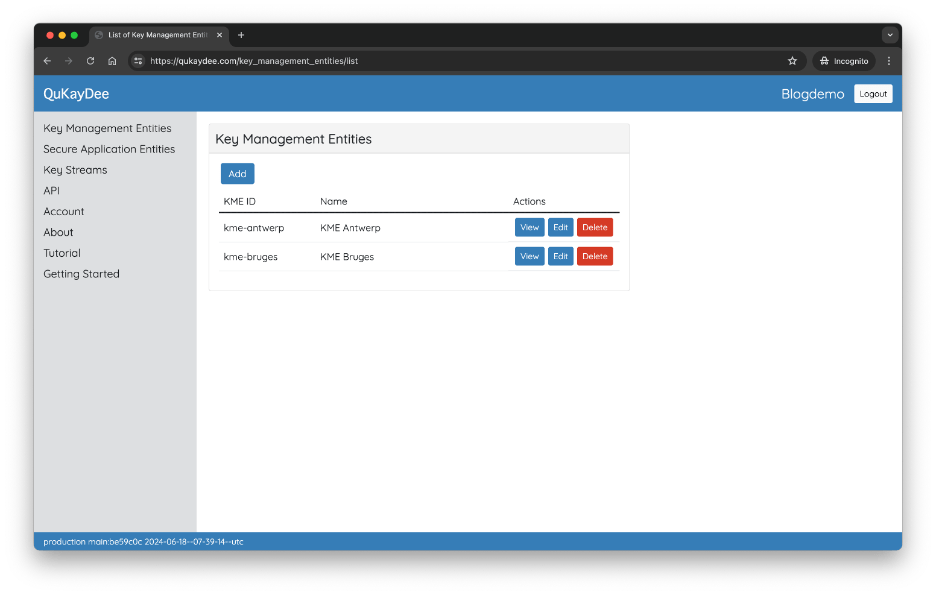
Make a note of the API hostname for KME Antwerp:
- In the Key Management Entities screen
- Click View for kme-antwerp
- Make a note of the Server API Hostname, in this example kme-antwerp.acct-1195.etsi-qkd-api.qukaydee.com

Create the Key Management Entity (KME) in Bruges:
- Select Key Management Entities in menu
- Click Add
- KME ID = kme-bruges
- Name = KME Bruges
- Click Save

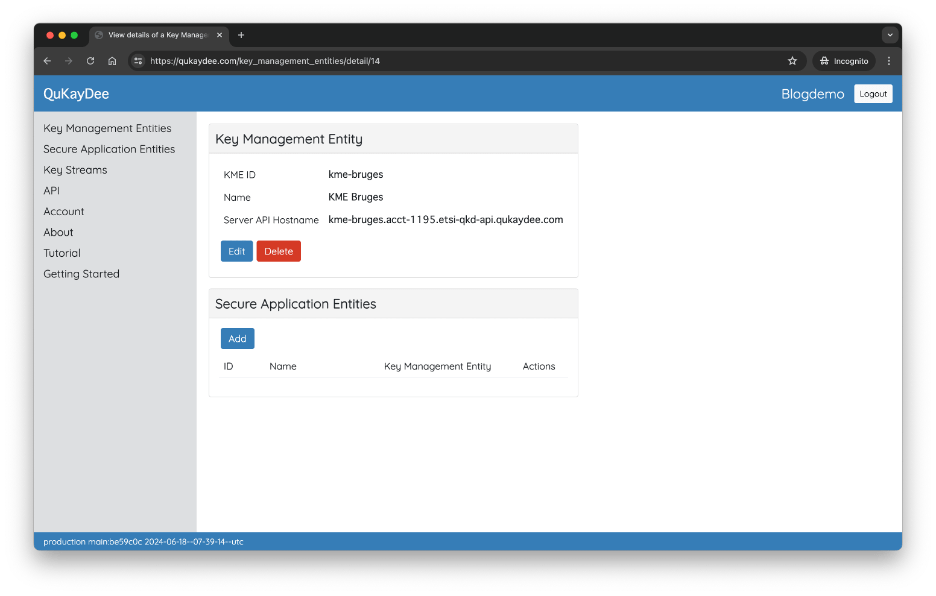
Collect the API hostname for KME Bruges:
- In the Key Management Entities screen
- Click View for kme-bruges
- Make a note of the Server API Hostname => kme-bruges.acct-1195.etsi-qkd-api.qukaydee.com
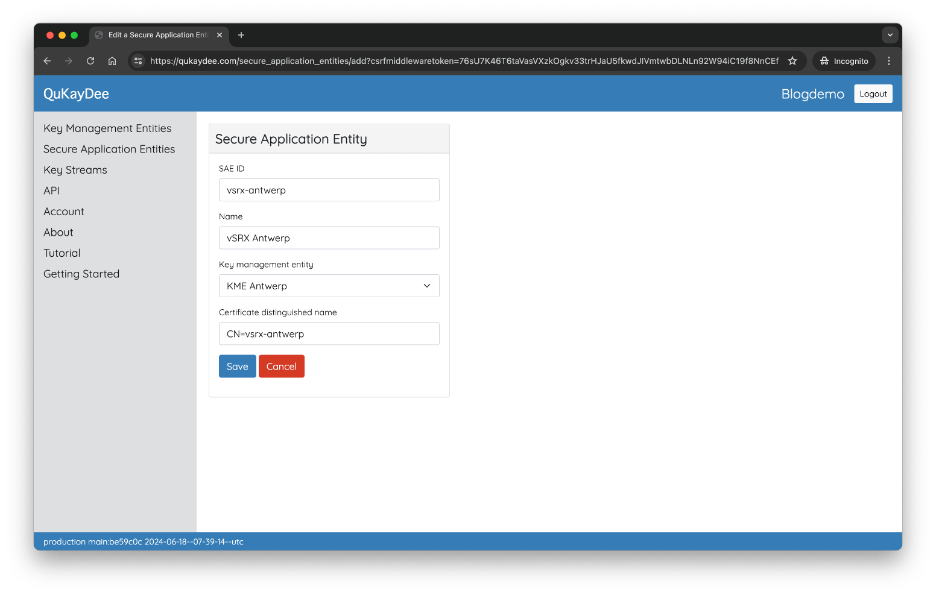
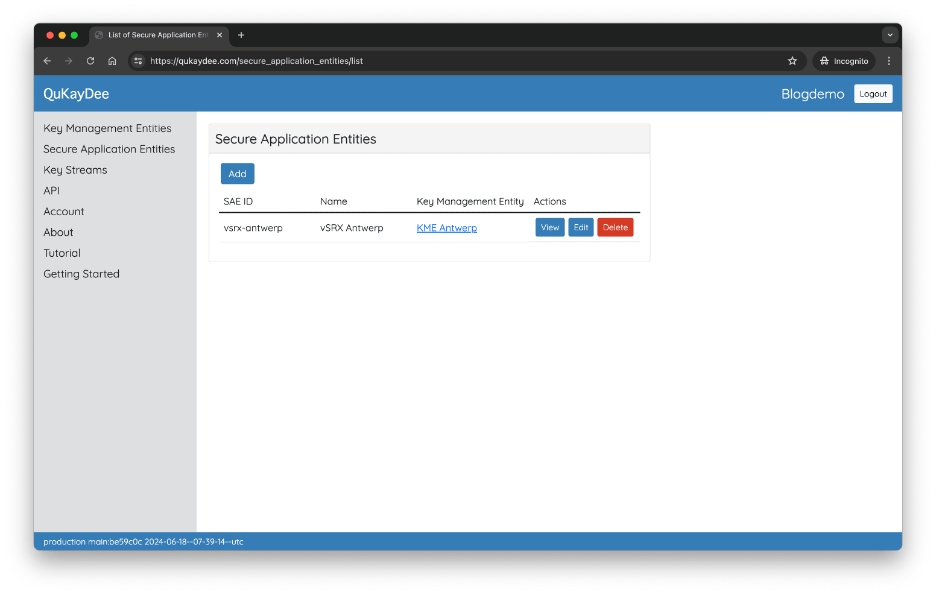
Create the Secure Application Entity representing vSRX Antwerp:
- Select Secure Application Entities in menu
- Click Add
- SAE ID = vsrx-antwerp
- Name = vSRX Antwerp
- Key Management Entity = Select KME Antwerp
- Certificate distinguished name = CN=vsrx-antwerp
- Click Save
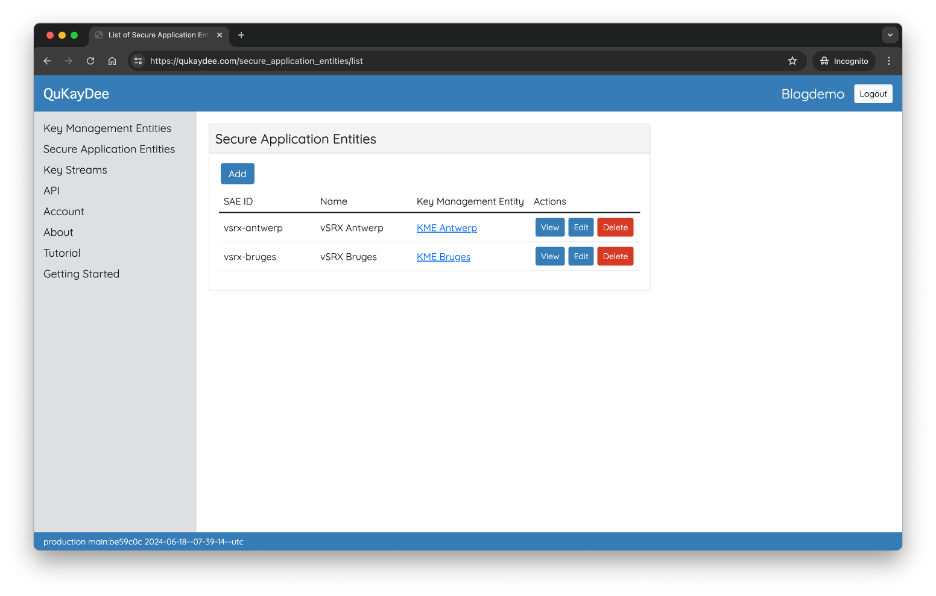
Create the Secure Application Entity representing vSRX Bruges:
- Select Secure Application Entities in menu
- Click Add
- SAE ID = vsrx-bruges
- Name = vSRX Bruges
- Key Management Entity = Select KME Bruges
- Certificate distinguished name = CN=vsrx-bruges
Click Save

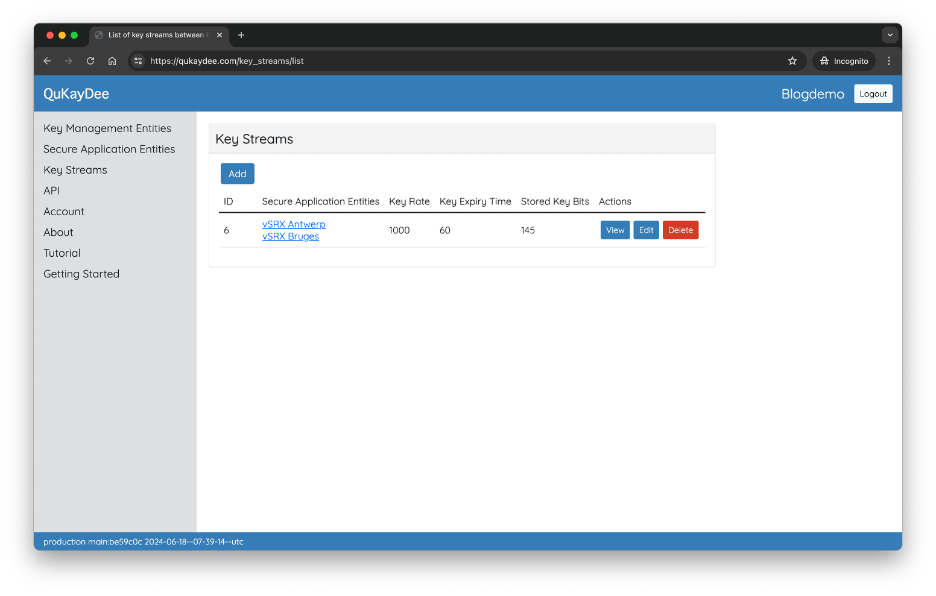
Create a Key Stream between vSRX Antwerp and vSRX Bruges:
- Select Key Streams in menu
- Click Add
- Secure application entities = Select both vSRX Antwerp and vSRX Bruges
- Key rate = 1000
- Key expiry time = 60
- Click Save

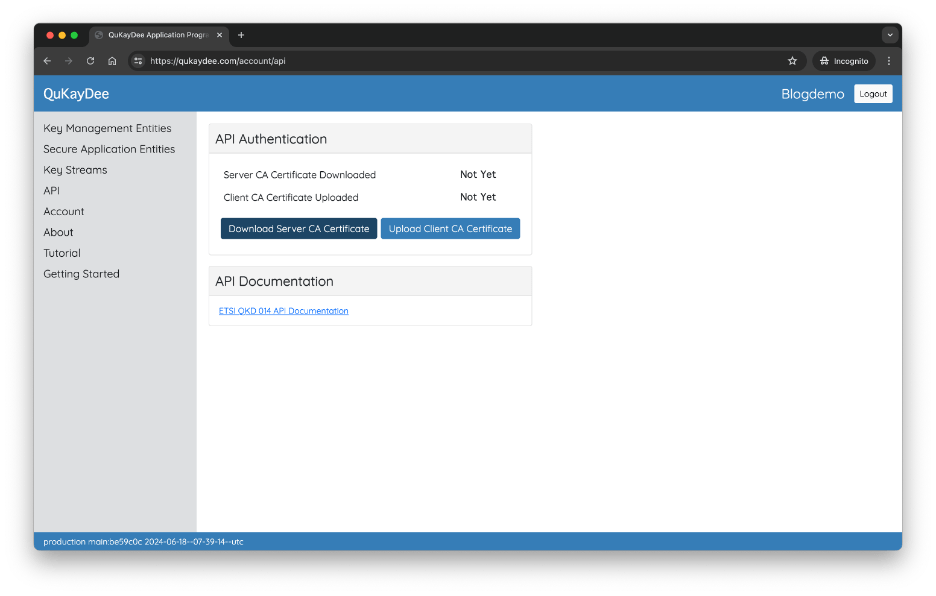
Download Server CA Certificate:
- Select API in menu
- Click Download Server CA Certificate
- Copy the downloaded file (in this case account-1195-server-ca-qukaydee-com.crt) in some location for later use
Generate the Client Keys and Certificates. GitHub repository brunorijsman/qukaydee-generate-client-certificates contains convenience scripts that invoke the right sequence of OpenSSL commands to generate the client keys and certificates.
In a shell on your computer, clone the repository:
$ git clone https://github.com/brunorijsman/qukaydee-generate-client-certificates.gitInvoke the script to generate the client root CA keys and certificates:
$ ./qukaydee-generate-client-certificates/generate-client-root-ca-certificate-and-key.shThis generates key and certificate files as shown by the following ls command:
$ ls -1 client-root-ca*
client-root-ca.crt
client-root-ca.key
Invoke the script to generate the client keys and certificates for vSRX Antwerp:
$ ls -1 vsrx-antwerp*
vsrx-antwerp.crt
vsrx-antwerp.key
vsrx-antwerp.pem
Invoke the script to generate the client keys and certificates for vSRX Bruges:
$ ./qukaydee-generate-client-certificates/generate-client-sae-certificate-and-key.sh vsrx-brugesThis generates key and certificate files as shown by the following ls command:
$ ls -1 vsrx-bruges*
vsrx-bruges.crt
vsrx-bruges.key
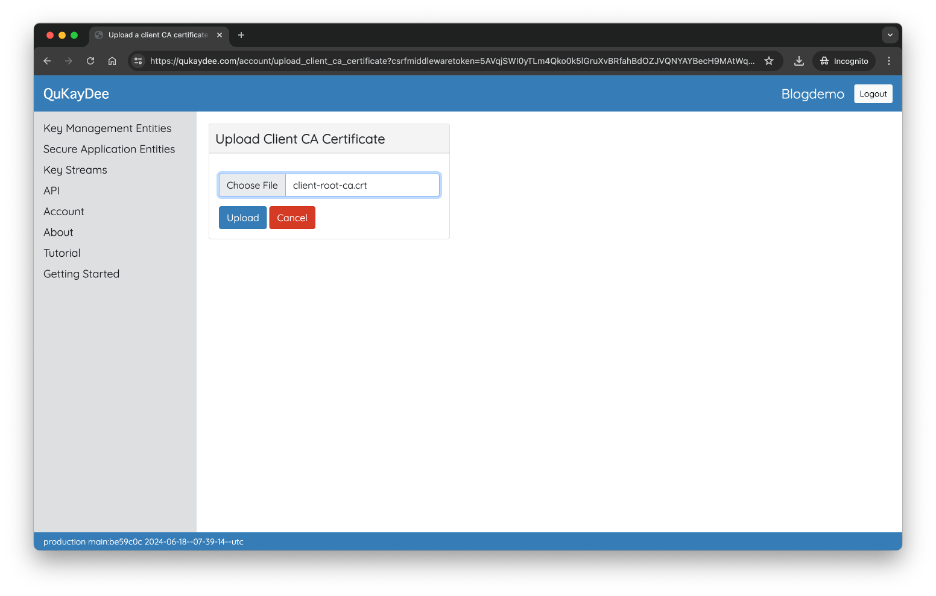
vsrx-bruges.pemUpload Client CA Certificate to QuKayDee:
- Select API in menu
- Click Upload Client CA Certificate
- Click Choose File
- In the file picker, select the file client-root-ca.crt file which was generated above
- Click Upload


At this point, QuKayDee is ready to start delivery QKD keys to the vSRXs.
4.6 Reconfigure the vSRXs to consume QKD keys from QuKayDee
We will now re-configure the vSRXs to use QKD-produced instead of Diff-Hellman-produced encryption keys for the IPsec tunnel.
On vSRX Antwerp, install software package junos-ike.tgz to enable QKD key manager functionality (you don’t need to download this package, it is pre-installed on the vSRX by default):
ec2-user@vsrx-antwerp> request system software add optional://junos-ike.tgz
Verified junos-ike signed by PackageProductionECP256_2024 method ECDSA256+SHA256
Rebuilding schema and Activating configuration...
mgd: commit complete
Restarting MGD ...

WARNING: cli has been replaced by an updated version:
CLI release 20240208.021849_builder.r1400276 built by builder on 2024-02-08 02:33:00 UTC
Restart cli using the new version ? [yes,no] (yes) yes

Restarting cli ...
Do the same on vSRX Bruges:
ec2-user@vsrx-bruges> request system software add optional://junos-ike.tgz
Verified junos-ike signed by PackageProductionECP256_2024 method ECDSA256+SHA256
Rebuilding schema and Activating configuration...
mgd: commit complete
Restarting MGD ...

WARNING: cli has been replaced by an updated version:
CLI release 20240208.021849_builder.r1400276 built by builder on 2024-02-08 02:33:00 UTC
Restart cli using the new version ? [yes,no] (yes) yes

Restarting cli ...
Add the following configuration to vSRX Antwerp, on top of the existing configuration. Replace the highlighted number 1195 with the account number in the Server API Hostname that you made a note of earlier when you created the SAE in QuKayDee. We will explain the meaning of this configuration later.
system {
    services {
        ssh {
            sftp-server;
        }
    }
}
security {
    pki {
        ca-profile KMS-CA-PROFILE {
            ca-identity KMS-CA-IDENTITY;
        }
        ca-profile VSRX-CA-PROFILE {
            ca-identity VSRX-CA-IDENTITY;
        }
    }
    ike {
        gateway IKE-GATEWAY {
            ppk-profile KEY-MANAGER-PROFILE;
        }
    }
    key-manager {
        profiles {
            KEY-MANAGER-PROFILE {
                quantum-key-manager {
                    url https://kme-antwerp.acct-1195.etsi-qkd-api.qukaydee.com;
                    local-sae-id vsrx-antwerp;
                    peer-sae-ids vsrx-bruges;
                    local-certificate-id VSRX-ANTWERP-CERTIFICATE-ID;
                    trusted-cas KMS-CA-PROFILE;
                }
            }
        }
    }
}
Add the following configuration to vSRX Bruges, on top of the existing configuration:
system {
    services {
        ssh {
            sftp-server;
        }
    }
}
security {
    pki {
        ca-profile KMS-CA-PROFILE {
            ca-identity KMS-CA-IDENTITY;
        }
        ca-profile VSRX-CA-PROFILE {
            ca-identity VSRX-CA-IDENTITY;
        }
    }
    ike {
        gateway IKE-GATEWAY {
            ppk-profile KEY-MANAGER-PROFILE;
        }
    }
    key-manager {
        profiles {
            KEY-MANAGER-PROFILE {
                quantum-key-manager {
                    url https://kme-bruges.acct-1195.etsi-qkd-api.qukaydee.com;
                    local-sae-id vsrx-bruges;
                    peer-sae-ids vsrx-antwerp;
                    local-certificate-id VSRX-BRUGES-CERTIFICATE-ID;
                    trusted-cas KMS-CA-PROFILE;
                }
            }
        }
    }
}
Copy the necessary keys and certificates (which we generated earlier) from your computer to vSRX Antwerp:
$ scp -i $VSRX_SSH_KEY account-1195-server-ca-qukaydee-com.crt client-root-ca.crt vsrx-antwerp.key vsrx-antwerp.crt ec2-user@$VSRX_ANTWERP_IP:
account-1195-server-ca-qukaydee-com.crt           100% 1249    17.0KB/s   00:00
client-root-ca.crt                                100% 1127    13.8KB/s   00:00
vsrx-antwerp.key                                  100% 1704    21.7KB/s   00:00
vsrx-antwerp.crt                                  100% 1168    16.3KB/s   00:00
On vSRX Antwerp, load the keys and certificates. Once again, replace the number 1195 with your QuKayDee account number noted earlier.
ec2-user@vsrx-antwerp> request security pki ca-certificate load filename account-1195-server-ca-qukaydee-com.crt ca-profile KMS-CA-PROFILE
Fingerprint:
  fa:0c:b4:a9:64:32:26:58:e2:b9:05:57:e9:7b:94:6f:44:ae:b8:09 (sha1)
  2c:96:e3:80:a7:1d:1e:78:65:e1:21:3e:d0:0d:44:03 (md5)
  d6:b5:98:71:e0:76:2e:9d:c1:d2:bf:63:36:7d:f8:90:8d:8d:bf:ed:fc:ad:08:3c:ec:70:6c:70:73:e3:29:62 (sha256)
Do you want to load this CA certificate ? [yes,no] (no) yes

CA certificate for profile KMS-CA-PROFILE loaded successfully

ec2-user@vsrx-antwerp> request security pki ca-certificate load filename client-root-ca.crt ca-profile VSRX-CA-PROFILE
Fingerprint:
  fa:42:0b:c0:bb:16:42:1a:5d:a1:4f:c8:d3:c1:9a:2a:cb:a0:f1:91 (sha1)
  f5:5b:b5:da:b6:a0:ed:29:bd:1f:61:0e:33:cd:97:18 (md5)
  dc:4e:28:1f:38:28:08:26:c1:88:0e:1f:90:ae:49:6b:e1:3c:1d:f8:63:8c:fe:05:a4:25:28:69:47:84:45:72 (sha256)
Do you want to load this CA certificate ? [yes,no] (no) yes

CA certificate for profile VSRX-CA-PROFILE loaded successfully

ec2-user@vsrx-antwerp> request security pki local-certificate load filename vsrx-antwerp.crt key vsrx-antwerp.key certificate-id VSRX-ANTWERP-CERTIFICATE-ID
Local certificate loaded successfully
Copy the necessary keys and certificates (which we generated earlier) from your computer to vSRX Bruges:
$ scp -i $VSRX_SSH_KEY account-1195-server-ca-qukaydee-com.crt client-root-ca.crt vsrx-bruges.key vsrx-bruges.crt ec2-user@$VSRX_BRUGES_IP:
account-1195-server-ca-qukaydee-com.crt           100% 1249    15.2KB/s   00:00
client-root-ca.crt                                100% 1127    13.7KB/s   00:00
vsrx-bruges.key                                   100% 1704    20.8KB/s   00:00
vsrx-bruges.crt                                   100% 1164    14.3KB/s   00:00
On vSRX Bruges, load the keys and certificates. Once again, replace the number 1195 with your QuKayDee account number noted earlier.
ec2-user@vsrx-bruges> request security pki ca-certificate load filename account-1195-server-ca-qukaydee-com.crt ca-profile KMS-CA-PROFILE
Fingerprint:
  fa:0c:b4:a9:64:32:26:58:e2:b9:05:57:e9:7b:94:6f:44:ae:b8:09 (sha1)
  2c:96:e3:80:a7:1d:1e:78:65:e1:21:3e:d0:0d:44:03 (md5)
  d6:b5:98:71:e0:76:2e:9d:c1:d2:bf:63:36:7d:f8:90:8d:8d:bf:ed:fc:ad:08:3c:ec:70:6c:70:73:e3:29:62 (sha256)
Do you want to load this CA certificate ? [yes,no] (no) yes

CA certificate for profile KMS-CA-PROFILE loaded successfully

ec2-user@vsrx-bruges> request security pki ca-certificate load filename client-root-ca.crt ca-profile VSRX-CA-PROFILE
Fingerprint:
  fa:42:0b:c0:bb:16:42:1a:5d:a1:4f:c8:d3:c1:9a:2a:cb:a0:f1:91 (sha1)
  f5:5b:b5:da:b6:a0:ed:29:bd:1f:61:0e:33:cd:97:18 (md5)
  dc:4e:28:1f:38:28:08:26:c1:88:0e:1f:90:ae:49:6b:e1:3c:1d:f8:63:8c:fe:05:a4:25:28:69:47:84:45:72 (sha256)
Do you want to load this CA certificate ? [yes,no] (no) yes

CA certificate for profile VSRX-CA-PROFILE loaded successfully

ec2-user@vsrx-bruges> request security pki local-certificate load filename vsrx-bruges.crt key vsrx-bruges.key certificate-id VSRX-BRUGES-CERTIFICATE-ID
Local certificate loaded successfully
We now explain the various parts of the new configuration on vSRX Antwerp.
The following section creates the profile for the quantum-key-manager. It defines the configuration parameters for the ETSI QKD 014 API for retrieving the keys from the QKD device, namely:
- The URL of the Key Management Entity (KME) simulated in QuKayDee that provides the ETSI QKD 014 API.
- The Secure Application Entity (SAE) ID of the local vSRX and the remote vSRX.
- The X.509 certificate that the vSRX uses to authenticate itself to the KME.
- The X.509 root CA certificate that the vSRX uses to validate the certificate that is used for the KME to authenticate itself to the vSRX.
Note that the actual certificates and private keys are onboarded onto the vSRX using the request commands shown above.
security {
    key-manager {
        profiles {
            KEY-MANAGER-PROFILE {
                quantum-key-manager {
                    url https://kme-antwerp.acct-1195.etsi-qkd-api.qukaydee.com;
                    local-sae-id vsrx-antwerp;
                    peer-sae-ids vsrx-bruges;
                    local-certificate-id VSRX-ANTWERP-CERTIFICATE-ID;
                    trusted-cas KMS-CA-PROFILE;
                }
            }
        }
    }
}
The following section defines the Certificate Authorities (CAs) that are used to validate certificate provided by the KMS and by the vSRX.
security {
    pki {
        ca-profile KMS-CA-PROFILE {
            ca-identity KMS-CA-IDENTITY;
        }
        ca-profile VSRX-CA-PROFILE {
            ca-identity VSRX-CA-IDENTITY;
        }
    }
}
The following section adds one more configuration statement (in addition to the configuration statements that were already there) to the IKE gateway. The ppk-profile statement enable the use of Post-quantum Pre-shared Keys (PPK) for the IPsec tunnel. The KEY-MANAGER-PROFILE (which is shown above) further enables the use of ETSI QKD 014 to retrieve these “pre-shared” keys (which are actually not pre-shared by dynamically generated using a QKD protocol).
security {
    ike {
        gateway IKE-GATEWAY {
            ppk-profile KEY-MANAGER-PROFILE;
        }
    }
}
4.7 Verify that the IPsec tunnel (using QKD keys) comes up
Perform the following show commands on vSRX Antwerp to verify that everything is working as expected, in particular that the IPsec tunnel is now using QKD-produced keys instead of Diffie-Hellman-produced keys.
On vSRX Antwerp, verify that the IKE security association to vSRX Bruges is up:
ec2-user@vsrx-antwerp> show security ike security-associations
Index   State  Initiator cookie  Responder cookie  Mode           Remote Address
5       UP     3df7ff7d441060f0  a33fa5ea252b3156  IKEv2          10.0.2.22
Look at the details for the IKE security association. The bold italic fields that we are now using QKD-derived keys.
ec2-user@vsrx-antwerp> show security ike security-associations detail
IKE peer 10.0.2.22, Index 5, Gateway Name: IKE-GATEWAY
  Role: Initiator, State: UP
  Initiator cookie: 3df7ff7d441060f0, Responder cookie: a33fa5ea252b3156
  Exchange type: IKEv2, Authentication method: Pre-shared-keys
  Local gateway interface: ge-0/0/0.0
  Routing instance: default
  Local: 10.0.2.11:500, Remote: 10.0.2.22:500
  Lifetime: Expires in 28677 seconds
  Reauth Lifetime: Disabled
  IKE Fragmentation: Enabled, Size: 576
  Remote Access Client Info: Unknown Client
  Peer ike-id: 10.0.2.22
  AAA assigned IP: 0.0.0.0
  PPK-profile: KEY-MANAGER-PROFILE
     Optional: No
     State   : Used
  Algorithms:
   Authentication        : hmac-sha256-128
   Encryption            : aes256-cbc
   Pseudo random function: hmac-sha256
   Diffie-Hellman group  : DH-group-14
  Traffic statistics:
   Input  bytes  :                  805
   Output bytes  :                  854
   Input  packets:                    2
   Output packets:                    2
   Input  fragmented packets:       0
   Output fragmented packets:       0
  IPSec security associations: 2 created, 0 deleted
  Phase 2 negotiations in progress: 1
  IPSec Tunnel IDs: 500001

    Negotiation type: Quick mode, Role: Initiator, Message ID: 0
    Local: 10.0.2.11:500, Remote: 10.0.2.22:500
    Local identity: 10.0.2.11
    Remote identity: 10.0.2.22
    Flags: IKE SA is created

  IPsec SA Rekey CREATE_CHILD_SA exchange stats:
   Initiator stats:                                  Responder stats:
    Request Out             : 0                       Request In             : 0
    Response In             : 0                       Response Out           : 0
    No Proposal Chosen In   : 0                       No Proposal Chosen Out : 0
    Invalid KE In           : 0                       Invalid KE Out         : 0
    TS Unacceptable In      : 0                       TS Unacceptable Out    : 0
    Res DH Compute Key Fail : 0                       Res DH Compute Key Fail: 0
    Res Verify SA Fail      : 0
    Res Verify DH Group Fail: 0
    Res Verify TS Fail      : 0
Verify that the IPsec security association to vSRX Bruges is up:
ec2-user@vsrx-antwerp> show security ipsec security-associations
  Total active tunnels: 1     Total IPsec sas: 1
  ID      Algorithm       SPI      Life:sec/kb  Mon lsys Port  Gateway
  <500001 ESP:aes-cbc-256/sha512 0x85a04763 3423/ unlim - root 500 10.0.2.22
  >500001 ESP:aes-cbc-256/sha512 0x9d661d7c 3423/ unlim - root 500 10.0.2.22
Look at the details for the IPsec security association:
ec2-user@vsrx-antwerp> show security ipsec security-associations detail

ID: 500001 Virtual-system: root, VPN Name: IPSEC-VPN
  Local Gateway: 10.0.2.11, Remote Gateway: 10.0.2.22
  Local Identity: ipv4(0.0.0.0-255.255.255.255)
  Remote Identity: ipv4(0.0.0.0-255.255.255.255)
  TS Type: proxy-id
  Version: IKEv2
  Quantum Secured: Yes
  PFS group: N/A
  DF-bit: clear, Copy-Outer-DSCP: Disabled, Bind-interface: st0.0, Policy-name: IPSEC-POLICY
  Port: 500, Nego#: 0, Fail#: 0, Def-Del#: 0 Flag: 0
  Multi-sa, Configured SAs# 0, Negotiated SAs#: 0
  Tunnel events:
    Mon Jul 15 2024 19:43:53: IPsec SA negotiation succeeds (1 times)
  Location: FPC 0, PIC 0, KMD-Instance 0
  Anchorship: Thread 1
  Distribution-Profile: default-profile
  Direction: inbound, SPI: 0x85a04763, AUX-SPI: 0
                              , VPN Monitoring: -
    Hard lifetime: Expires in 3267 seconds
    Lifesize Remaining:  Unlimited
    Soft lifetime: Expires in 2616 seconds
    Mode: Tunnel(0 0), Type: dynamic, State: installed
    Protocol: ESP, Authentication: hmac-sha512, Encryption: aes-cbc (256 bits)
    Anti-replay service: counter-based enabled, Replay window size: 64
    Extended-Sequence-Number: Disabled
    tunnel-establishment: establish-tunnels-immediately
    IKE SA Index: 5
  Direction: outbound, SPI: 0x9d661d7c, AUX-SPI: 0
                              , VPN Monitoring: -
    Hard lifetime: Expires in 3267 seconds
    Lifesize Remaining:  Unlimited
    Soft lifetime: Expires in 2616 seconds
    Mode: Tunnel(0 0), Type: dynamic, State: installed
    Protocol: ESP, Authentication: hmac-sha512, Encryption: aes-cbc (256 bits)
    Anti-replay service: counter-based enabled, Replay window size: 64
    Extended-Sequence-Number: Disabled
    tunnel-establishment: establish-tunnels-immediately
    IKE SA Index: 5
Verify that we can ping from the loopback of vSRX Antwerp to the loopback of vSRX Bruges:
ec2-user@vsrx-antwerp> ping count 5 source 11.11.11.11 22.22.22.22
PING 22.22.22.22 (22.22.22.22): 56 data bytes
64 bytes from 22.22.22.22: icmp_seq=0 ttl=64 time=0.719 ms
64 bytes from 22.22.22.22: icmp_seq=1 ttl=64 time=0.777 ms
64 bytes from 22.22.22.22: icmp_seq=2 ttl=64 time=0.765 ms
64 bytes from 22.22.22.22: icmp_seq=3 ttl=64 time=0.697 ms
64 bytes from 22.22.22.22: icmp_seq=4 ttl=64 time=0.725 ms

--- 22.22.22.22 ping statistics ---
5 packets transmitted, 5 packets received, 0% packet loss
round-trip min/avg/max/stddev = 0.697/0.737/0.777/0.030 ms
4.8 View the IKEv2 protocol using QKD keys
We will now use Wireshark to view the IKEv2 protocol messages for setting up the IPsec tunnel.
On vSRX Antwerp, start a packet capture on interface ge-0/0/0.0:
ec2-user@vsrx-antwerp> monitor traffic interface ge-0/0/0.0 write-file dump.pcap size 10000
Address resolution is ON. Use <no-resolve> to avoid any reverse lookup delay.
Address resolution timeout is 4s.
Listening on ge-0/0/0.0, capture size 10000 bytes
On vSRX Bruges, clear the IKE security associations to force the IPsec tunnel to be brought down and up again:
ec2-user@vsrx-bruges> clear security ike security-associationsWait a few seconds and make sure the IPsec tunnel is up again:
ec2-user@vsrx-bruges> show security ike security-associations
Index   State  Initiator cookie  Responder cookie  Mode           Remote Address
6       UP     9e03708003402e90  50fed8c85bca73cc  IKEv2          10.0.2.11
On vSRX Antwerp, stop the packet capture by typing Control-C:
^C
6 packets received by filter
0 packets dropped by kernel
Verify that the capture file is present:
ec2-user@vsrx-antwerp> file list dump.pcap
/var/home/ec2-user/dump.pcap
On your computer, download the capture file:
$ scp -i $VSRX_SSH_KEY ec2-user@$VSRX_ANTWERP_IP:dump.pcap .
dump.pcap              100% 2293    12.7KB/s   00:00
We will use Wireshark to view the packet capture file. You can download and install if from the Wireshark website.
Open the downloaded capture file using Wireshark; on macOS you can use the open command for this:
$ open dump.pcapWireshark shows six Internet Security Association and Key Management Protocol (ISAKMP) messages:

The first two INFORMATIONAL messages are to tear down the old IPsec tunnel when the clear command was issued.
If you expand the first IKA_SA_INIT message, you can see a Notify Message Type 16435, which is defined as USE_PPK (use a Post-quantum Pre-shared Key) in RFC8784.
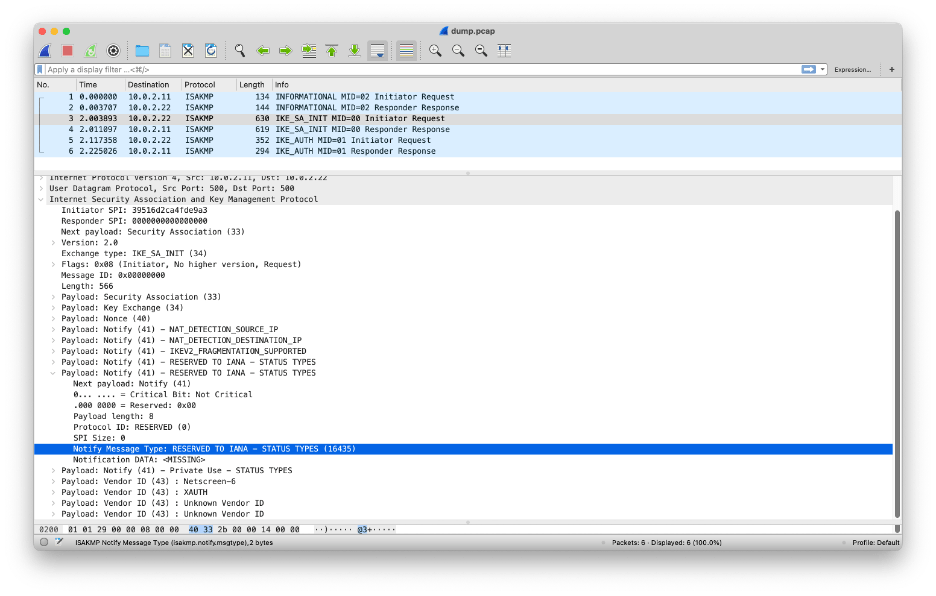
Unfortunately, we cannot look deep into the IKE_AUTH messages because they are mostly encrypted:

If anyone knows how to disable IKE encryption (just for educational purposes), please let me know.
4.9 Key roll-over
So far, each vSRX only asks for a QKD key once when the IPsec tunnel is established. To see the vSRX asking for the key, configure the following trace options on vSRX Antwerp:
security {
   key-manager {
        traceoptions {
            file key-manager-trace;
            level extensive;
        }
    }
}
To monitor the trace file, issue a tail -f command from the shell:
ec2-user@vsrx-antwerp> start shell
% tail -f /var/log/key-manager-trace | grep api/v1/keys
... Trace messages appear here ...
On vSRX Bruges, clear the IKE security association:
ec2-user@vsrx-bruges> clear security ike security-associationsWhen the IKE security association bounces, you see vSRX Antwerp invoking the ETSI QKD 014 API to ask for new keys. In this example vSRX Antwerp is the master and invokes the Get Key method (enc_keys in the URL):
Jul 19 22:26:16.889091 [DET] [HTTP] http-process-req: req-id (17) processing scheduled: url: (https://kme-antwerp.acct-1195.etsi-qkd-api.qukaydee.com/api/v1/keys/vsrx-bruges/enc_keys) post-data ({"number":1,"size":256})

Jul 19 22:26:16.953104 [DET] [HTTP] http-client-request-check-status: req-id (17) URL: https://kme-antwerp.acct-1195.etsi-qkd-api.qukaydee.com/api/v1/keys/vsrx-bruges/enc_keys DONE http-rsp-code (200) status-code (0) status-str (No error)
But depending on timing, vSRX Bruges might also end up as the master, in which case vSRX Antwerp invokes the Get Key with Key IDs method (dec_keys in the URL).
ul 19 22:25:00.855752 [DET] [HTTP] http-process-req: req-id (13) processing scheduled: url: (https://kme-antwerp.acct-1195.etsi-qkd-api.qukaydee.com/api/v1/keys/vsrx-bruges/dec_keys) post-data ({"key_IDs":[{"key_ID":"fe71a2d7-16a0-4b91-a5bb-558ecc96d779"}]})

Jul 19 22:25:00.910000 [DET] [HTTP] http-client-request-check-status: req-id (13) URL: https://kme-antwerp.acct-1195.etsi-qkd-api.qukaydee.com/api/v1/keys/vsrx-bruges/dec_keys DONE http-rsp-code (200) status-code (0) status-str (No error)
Either way, the thing to notice is that vSRX Antwerp only asks for a fresh key once after the security association is cleared, and then never asks for a key again as long as the security association stays up.
We will now enable periodic key rollovers, forcing the vSRX to change the key for the IPsec tunnel every 3 minutes.
Add the following configuration to vSRX Antwerp:
security {
    ike {
        proposal IKE-PROPOSAL {
            lifetime-seconds 180;
        }
        policy IKE-POLICY {
            reauth-frequency 1;
        }
    }
}
Add the same configuration on vSRX Bruges:
security {
    ike {
        proposal IKE-PROPOSAL {
            lifetime-seconds 180;
        }
        policy IKE-POLICY {
            reauth-frequency 1;
        }
    }
}
Setting lifetime-seconds to 180 causes the IKE security association to rekey every 3 minutes (= 180 seconds). There is a provision in RFC8784 that does not allow PPKs to be fetched during IKE rekey. That means without further configuration PPKs are indeed only fetched during initial IKE SA negotiation. This is why we also set reauth-frequency to 1: it forces the vSRX to redo the initial IKE SA negotiation on every rekey.
In the details of the IKE security association on vSRX Antwerp you can see the remaining time until the next key roll-over:
ec2-user@vsrx-antwerp> show security ike security-associations detail
IKE peer 10.0.2.22, Index 17, Gateway Name: IKE-GATEWAY
  Role: Initiator, State: UP
  Initiator cookie: 4f9ae89c28884746, Responder cookie: 9c69a3a4ee83d734
  Exchange type: IKEv2, Authentication method: Pre-shared-keys
  Local gateway interface: ge-0/0/0.0
  Routing instance: default
  Local: 10.0.2.11:500, Remote: 10.0.2.22:500
  Lifetime: Expires in 142 seconds
  Reauth Lifetime: Expires in 142 seconds
  IKE Fragmentation: Enabled, Size: 576
  Remote Access Client Info: Unknown Client
  Peer ike-id: 10.0.2.22
  AAA assigned IP: 0.0.0.0
  PPK-profile: KEY-MANAGER-PROFILE
     Optional: No
     State   : Used
  Algorithms:
   Authentication        : hmac-sha256-128
   Encryption            : aes256-cbc
   Pseudo random function: hmac-sha256
   Diffie-Hellman group  : DH-group-14
  Traffic statistics:
   Input  bytes  :                  805
   Output bytes  :                  854
   Input  packets:                    2
   Output packets:                    2
   Input  fragmented packets:       0
   Output fragmented packets:       0
  IPSec security associations: 2 created, 0 deleted
  Phase 2 negotiations in progress: 1
  IPSec Tunnel IDs: 500001

    Negotiation type: Quick mode, Role: Initiator, Message ID: 0
    Local: 10.0.2.11:500, Remote: 10.0.2.22:500
    Local identity: 10.0.2.11
    Remote identity: 10.0.2.22
    Flags: IKE SA is created

  IPsec SA Rekey CREATE_CHILD_SA exchange stats:
   Initiator stats:                                  Responder stats:
    Request Out             : 0                       Request In             : 0
    Response In             : 0                       Response Out           : 0
    No Proposal Chosen In   : 0                       No Proposal Chosen Out : 0
    Invalid KE In           : 0                       Invalid KE Out         : 0
    TS Unacceptable In      : 0                       TS Unacceptable Out    : 0
    Res DH Compute Key Fail : 0                       Res DH Compute Key Fail: 0
    Res Verify SA Fail      : 0
    Res Verify DH Group Fail: 0
    Res Verify TS Fail      : 0
In the trace file (which we are monitoring using the tail -f command), we can see that vSRX Antwerp periodically invokes the ETSI QKD 014 API to fetch fresh keys. For some reason, it looks like it asks for fresh keys a bit faster than once ever 180 seconds, namely once every 150 seconds.
Jul 20 00:44:17.888627 [DET] [HTTP] http-process-req: req-id (39) processing scheduled: url: (https://kme-antwerp.acct-1195.etsi-qkd-api.qukaydee.com/api/v1/keys/vsrx-bruges/enc_keys) post-data ({"number":1,"size":256})

Jul 20 00:44:17.966507 [DET] [HTTP] http-client-request-check-status: req-id (39) URL: https://kme-antwerp.acct-1195.etsi-qkd-api.qukaydee.com/api/v1/keys/vsrx-bruges/enc_keys DONE http-rsp-code (200) status-code (0) status-str (No error)

Jul 20 00:46:28.138468 [DET] [HTTP] http-process-req: req-id (40) processing scheduled: url: (https://kme-antwerp.acct-1195.etsi-qkd-api.qukaydee.com/api/v1/keys/vsrx-bruges/dec_keys) post-data ({"key_IDs":[{"key_ID":"5c95a84a-0f4d-4693-a27c-4e54eb88f768"}]})

Jul 20 00:46:28.216481 [DET] [HTTP] http-client-request-check-status: req-id (40) URL: https://kme-antwerp.acct-1195.etsi-qkd-api.qukaydee.com/api/v1/keys/vsrx-bruges/dec_keys DONE http-rsp-code (200) status-code (0) status-str (No error)

Jul 20 00:48:37.238595 [DET] [HTTP] http-process-req: req-id (41) processing scheduled: url: (https://kme-antwerp.acct-1195.etsi-qkd-api.qukaydee.com/api/v1/keys/vsrx-bruges/enc_keys) post-data ({"number":1,"size":256})

Jul 20 00:48:37.342427 [DET] [HTTP] http-client-request-check-status: req-id (41) URL: https://kme-antwerp.acct-1195.etsi-qkd-api.qukaydee.com/api/v1/keys/vsrx-bruges/enc_keys DONE http-rsp-code (200) status-code (0) status-str (No error)
4.10 View the ETSI QKD 014 API Calls
In the previous section we use a Junos trace file on the vSRX to look a the HTTP requests on the ETSI QKD 014 APIs. QuKayDee provides a much more elegant and detailed mechanism for viewing these API calls.
On the QuKayDee web page, select API in the menu:
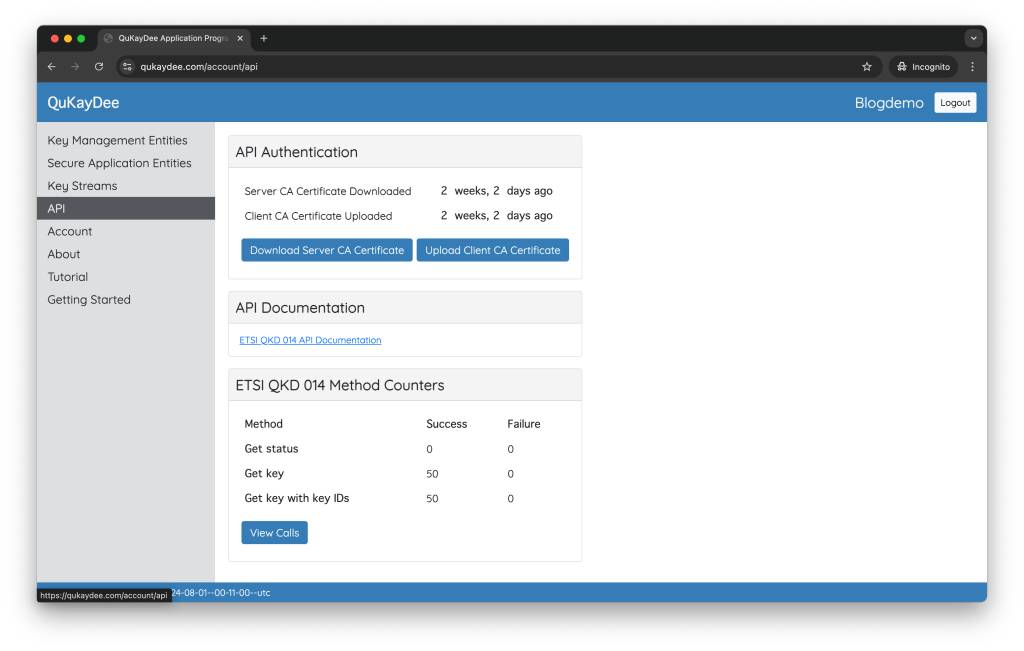
At the bottom you see counters for how often each ETSI QKD 014 method was invoked.
Click on the View Calls button to get a list of ETSI QKD 014 method calls (the most recent at the top):

Click on the View button next to any individual call to all details of that particular method call:

Appendix: Create AWS resources using the AWS console
In this appendix we provide step-by-step instruction for creating the resources shown in Figure 3 in AWS using the AWS console.
These resources will cost money, even if you still qualify for the free tier in AWS. Amazon will charge you for the AWS resources such as instances and elastic IP addresses. And we use the pay-as-you-go (PAYG) flavor of the Juniper vSRX virtual firewall which incurs an addition hourly fee of around US$ 0.75 per hour. You can avoid this fee by using the bring-you-own-license (BYOL) flavor of the Juniper vSRX firewall and requesting a free 60-day trial license key from Juniper.
Do not forget to delete the AWS resources after you are done with the tutorial to avoid a nasty surprise on your AWS bill.
In the instructions below, attribute values in bold are different from the Amazon default value. If an attribute value is not explicitly given, accept the default value.
Log in to AWS console https://console.aws.amazon.com/
Create a VPC:
- Go to Services > Networking & Content Delivery > VPC
- Click Create VPC
- Resources to create = VPC only
- Name tag = vsrx-vpc
- IPv4 CIDR block = manual input
- IPv4 CIDR = 10.0.0.0/16
- IPv6 CIDR block = No IPv6 CIDR block
- Tenancy = default
- Click Create VPC
Create the Internet gateway and attach it to VPC vsrx-vpc:
- Go to Services > Networking & Content Delivery > VPC > Internet gateways
- Click Create internet gateway
- Name tag = vsrx-igw
- Click Create internet gateway
- Click Attach to a VPC
- Available VPCs = Select vsrx-vpc
- Click Attach internet gateway
Create the management subnet:
- Go to Services > Networking & Content Delivery > VPC > Subnets
- Click Create subnet
- VPC ID = select vsrx-vpc
- Subnet name = vsrx-mgmt
- Availability zone = No preference
- IPv4 VPC CIDR block = 10.0.0.0/16
- IPv4 VPC CIDR bock = 10.0.1.0/24
- Click Create subnet
Create the management route table and associate it with subnet vsrx-mgmt:
- Go to Services > Networking & Content Delivery > VPC > Route tables
- Click Create route table
- Name = vsrx-mgmt-rt
- VPC = Select vsrx-vpc
- Click Create route table
- Click Edit routes
- Click Add route
- Destination = 0.0.0.0/0
- Target = Internet Gateway
- Select vsrx-igw as the target Internet gateway
- Click Save changes
- Click the Subnet associations tab
- Click Edit subnet associations
- Select subnet vsrx-mgmt
- Click Save associations
Create the untrusted subnet:
- Go to Services > Networking & Content Delivery > VPC > Subnets
- Click Create subnet
- VPC ID = select vsrx-vpc
- Subnet name = vsrx-untrust
- Availability zone = No preference
- IPv4 VPC CIDR block = 10.0.0.0/16
- IPv4 VPC CIDR bock = 10.0.2.0/24
- Click Create subnet
Create a key pair to SSH into both vSRXs:
- Go to Services > Compute > EC2 > Key Pairs
- Click Create key pair
- Name = vsrx-key-pair
- Key pair type = RSA (Note: do not choose ED2219; vSRX only supports RSA)
- Key file format = .pem
- Click Create key pair
- This will automatically download a file vsrx-key-pair.pem to your computer
- Move the file to your ~/.ssh directory and set the permissions:
$ mv ~/Downloads/vsrx-key-pair.pem ~/.ssh
$ chmod 400 ~/.ssh/vsrx-key-pair.pem- Set an environment variable for the location of the SSH key (you may want to add this to your shell profile):
$ export VSRX_SSH_KEY="$HOME/.ssh/vsrx-key-pair.pem"Create the vSRX Antwerp instance:
- Go to Services > Compute > EC2 > Instances
- Click Launch Instances
- Name = vsrx-antwerp
- Application and OS Images (Amazon Machine Image)
- Type vSRX in the search box and type Enter to search
- In the search results, click on the AWS Marketplace AMIs tab
- Select vSRX Next Generation Virtual Firewall (Note: do not select the BYOL AMI unless you have a license key from Juniper)
- As a reminder: that this AMI will cost about US$ 0.75 per hour
- Click Subscribe now
- Instance type = c5.large
- Key pair (login) = Select vsrx-key-pair
- Click Edit in Network Settings
- VPC = vsrx-vpc
- Subnet => vsrx-mgmt
- Auto-assign public IP =>Disable
- Select Create security group
- Security group name = vsrx-antwerp-mgmt-sg
- Description = vSRX Antwerp mgmt security group
- Click Add security group rule
- Type = HTTPS
- Source type = Anywhere
- Accept defaults for storage (20 GiB gp2)
- Click Launch instance
Create an allow everything security group:
- Go to Services > Compute > EC2 > Security Groups
- Click Create security group
- Security group name = allow-everything-sg
- Description = Allow everything security group
- VPC = Select vsrx-vpc
- Inbound rules: click Add Rule
- Type = All traffic
- Source = Anywhere-IPv4
- Click Create security group
Create the untrust interface for vSRX Antwerp and attach it:
- Go to Services > Compute > EC2 > Network Interfaces
- Click Create network interface
- Description = vSRX Antwerp untrust interface
- Subnet = Select vsrx-untrust
- Private IPv4 address = Custom
- IPv4 address = 10.0.2.11
- Elastic Fabric Adapter = Disable (don’t click Enable)
- Security group = Select allow-everything-sg
- Click Create network interface
- Click View network interface
- Select Actions > Attach
- VPC = vsrx-vpc
- Instance = vsrx-antwerp
- Click Attach
Create the public IP address for vSRX Antwerp and associate it:
- Go to Services > Compute > EC2 > Elastic IPs
- Click Allocate Elastic IP address
- Public IPv4 address pool = Amazon’s pool of IPv4 addresses
- Click Allocate
- Click Associate this Elastic IP address
- Resource type = Select Network interface
- Network interface = Select vsrx-antwerp-mgmt-if
- Private IP address = Select the only address in the list (10.0.2.something)
- Click Associate
- Set an environment variable for the public IP address allocated to vSRX Antwerp (you may want to add this to your shell profile):
$ export VSRX_ANTWERP_IP="allocated-public-ip-address"Create the vSRX Bruges instance:
- Go to Services > Compute > EC2 > Instances
- Click Launch Instances
- Name = vsrx-bruges
- Application and OS Images (Amazon Machine Image)
- Type vSRX in the search box and type Enter to search
- In the search results, click on the AWS Marketplace AMIs tab
- Select vSRX Next Generation Virtual Firewall (Note: do not select the BYOL AMI unless you have a license key from Juniper)
- As a reminder: that this AMI will cost about US$ 0.75 per hour
- Click Subscribe now
- Instance type = c5.large
- Key pair (login) = Select vsrx-key-pair
- Click Edit in Network Settings
- VPC = vsrx-vpc
- Subnet => vsrx-mgmt
- Auto-assign public IP =>Disable
- Select Create security group
- Security group name = vsrx-bruges-mgmt-sg
- Description = vSRX Bruges mgmt security group
- Click Add security group rule
- Type = HTTPS
- Source type = Anywhere
- Accept defaults for storage (20 GiB gp2)
- Click Launch instance
Create the untrust interface for vSRX Antwerp and attach it:
- Go to Services > Compute > EC2 > Network Interfaces
- Click Create network interface
- Description = vSRX Bruges untrust interface
- Subnet = Select vsrx-untrust
- Private IPv4 address = Custom
- IPv4 address = 10.0.2.22
- Elastic Fabric Adapter = Disable (don’t click Enable)
- Security group = Select allow-everything-sg
- Click Create network interface
- Click View network interface
- Select Actions > Attach
- VPC = vsrx-vpc
- Instance = vsrx-bruges
- Click Attach
Create the public IP address for vSRX Bruges and associate it:
- Go to Services > Compute > EC2 > Elastic IPs
- Click Allocate Elastic IP address
- Public IPv4 address pool = Amazon’s pool of IPv4 addresses
- Click Allocate
- Click Associate this Elastic IP address
- Resource type = Select Network interface
- Network interface = Select vsrx-bruges-mgmt-if
- Private IP address = Select the only address in the list (10.0.1.something)
- Click Associate
- Set an environment variable for the public IP address allocated to vSRX Bruges (you may want to add this to your shell profile):
$ export VSRX_BRUGES_IP="allocated-public-ip-address"Reboot both vSRXs (Note: this may seem superfluous, but it is necessary for Junos to generate its initial configuration using AWS metadata):
- Go to Services > Compute > EC2 > Instances
- Select both vsrx-antwerp and vsrx-bruges in the list of instances
- Select Instance state > Reboot instance
Authorize EC2 serial console access:
- Go to Services > Compute > EC2 > EC2 Dashboard
- Select Account attributes > EC2 Serial Console
- Click Manage
- Select Allow
- Click Update
Make sure vSRX Antwerp boots properly:
- Go to Services > Compute > EC2 > Instances
- Select only vsrx-antwerp in the list of instances
- Select Actions > Monitor and troubleshoot > EC2 serial console
- Click Connect
- Monitor the progress of the boot process
- Verify that eventually the login prompt appears
- Do not attempt to login on the serial console
Make sure vSRX Bruges boots properly:
- Go to Services > Compute > EC2 > Instances
- Select only vsrx-bruges in the list of instances
- Select Actions > Monitor and troubleshoot > EC2 serial console
- Click Connect
- Monitor the progress of the boot process
- Verify that eventually the login prompt appears
- Do not attempt to login on the serial console
SSH into vSRX Antwerp using the key and IP address environment variables set above:
$ ssh -i $VSRX_SSH_KEY ec2-user@$VSRX_ANTWERP_IP
The authenticity of host '18.221.226.150 (18.221.226.150)' can't be established.
ED25519 key fingerprint is SHA256:pV2YBAKRhqTMh5yYC9IeTAmEW0W9CNC8jTK5H4fPQ0s.
This key is not known by any other names
Are you sure you want to continue connecting (yes/no/[fingerprint])? yes
Warning: Permanently added '18.221.226.150' (ED25519) to the list of known hosts.
--- JUNOS 22.4R3.25 Kernel 64-bit XEN JNPR-12.1-20231013.108e0b3_buil
ec2-user>
SSH into vSRX Bruges using the key and IP address environment variables set above:
$ ssh -i $VSRX_SSH_KEY ec2-user@$VSRX_BRUGES_IP
The authenticity of host '3.141.205.234 (3.141.205.234)' can't be established.
ED25519 key fingerprint is SHA256:02qOtP8ZkwWwZi6C39sFuJX65YBaZIsPJvj8dlLxhOc.
This key is not known by any other names
Are you sure you want to continue connecting (yes/no/[fingerprint])? yes
Warning: Permanently added '3.141.205.234' (ED25519) to the list of known hosts.
--- JUNOS 22.4R3.25 Kernel 64-bit XEN JNPR-12.1-20231013.108e0b3_buil
ec2-user>
References
The video A Technical Look at IPSEC VPN Tunnel Create provides a good overview of the protocol message exchange for setting up an IPsec tunnel. It is a Cisco video, but most of the discussion is vendor-independent.
The Juniper book Day One: Quantum-Safe IPsec VPNs discusses the exact same topic as this blog and was a great resource. I would also like to express my thanks to Melchior Aelmans and Matthijs Nagel from Juniper for their help with this blog.
Juniper vSRX virtual next-generation firewall documentation.
QuKayDee: A cloud-based QKD network simulator focused on APIs.
RFC5996: Internet Key Exchange Protocol Version 2 (IKEv2)
RFC8784: Mixing Preshared Keys in the Internet Key Exchange Protocol Version 2 (IKEv2) for Post-quantum Security.
ETSI GS QKD 014 V1.1.1 (2019-02): Quantum Key Distribution (QKD): Protocol and data format of REST-based key delivery API.
Webinar: Protocols for Advanced Secure Networks.
Ghernaouti, Solange, MA Sfaxi, Grégoire Ribordy, and O Gay. “Using Quantum Key Distribution within IPSEC to Secure MAN Communications.” MAN 2005 Conference, January 1, 2005. Link.

Is qukaydee.com free to use or if not, how much does it cost?
LikeLike
It’s free.
LikeLike
Great write up. I tried it with Eve-ng and it works fine. I had to reboot the vsrx to get the IKE manager working after after adding Junos-IKE. Otherwise the step by step method described worked. Thank you for sharing.
LikeLike
Hi Eoin. Glad to hear it worked it worked for you!
LikeLike